Sunday, July 30, 2006


Tabletop


Friday, July 21, 2006


Pumpkin Tiramisu

Pumpkin Tiramisu

(Double recipe to use in large trifle bowl.)

1 pkg. authentic Italian ladyfingers (they're hard, not soft)
8 oz. Mascarpone cheese
1/2 c. pumpkin puree
1 tsp. cinnamon
1/2 to 1 tsp. freshly ground nutmeg (to taste)
1 1/2 c. powdered sugar (or to taste)
1 tsp. pure vanilla extract or orange extract
2 1/2 c. heavy cream, whipped and chilled
1/8 c. either Frangelico liqueur, rum or orange juice
Crystallized ginger

Arrange ladyfingers on the bottom of a 9" square pan. Pour liqueur over ladyfingers. Mix Mascarpone with the pumpkin, spices, sugar and extract. Fold in 1 1/2 c. of the whipped cream. Pour mixture over lady fingers. ( If using large trifle bowl, you can layer the ladyfingers and cream mixture: just make sure you sprinkle lady fingers with liquid--juice or liqueur--before covering with cream mixture). Gently spread remaining whipped cream on top of mixture. Sprinkle decoratively with additional cinnamon and crystallized ginger. Cover and chill at least two hours, or overnight.

Serves eight generously.

Friday, July 14, 2006


Formal Place setting

Setting a Formal Place setting...

from rockysgoldandsilver.com/faqs/


How do I properly set a formal dinner setting?

Plate:

Place your dinner plate on the table in front of the chair.

Above the Plate:

The cake fork will be closest to the plate with the tines facing right.
The dessert spoon will be above the cake fork with the bowl facing left.

Right Side of Plate:

To the right of the plate place your entree knife with the blade facing in toward the plate.
To the right of the knife place your teaspoon.
To the right of the teaspoon, place your soupspoon. (Either a round bowl, cream soup or the more versatile oval/place soup.)

Left Side of Plate:

To the left of your plate, place the entree fork and then the salad fork.
If you are using a bread plate you may place it either to the left of the forks or slightly above them.
Place your bread and butter knife on the bread plate with the blade facing toward the dinner plate.
Glasses go above the knives with the water glasses closest to the plate.
Wine glasses will go to the right of your water glass.
Napkin may be placed across the plate, or to the left of the forks.

Friday, July 07, 2006


Not like these invitations


Another what not to do


http://www.foxisland.net/ncc_weddings.htm


Thursday, July 06, 2006


Fund raiser

http://www.guidestar.org/news/features/online_auctions.jsp

On-line Auctions Raise Funds for Charity


Pumpkins

http://www.mass.gov/agr/massgrown/pumpkin_pyo.htm

Massachusetts

Pick-Your-Own Pumpkins

NOTE: information on this list is subject to change without notice to the Department. It's always a good idea to call the farm ahead of time to check on crop availability and picking conditions. Try printing this page in landscape orientation for better fit.

Farm Name
Address
Phone
Directions Hours of Operation Comments

Barnstable County

Andrews Farm
394 Old Meetinghouse Road
E. Falmouth
(508) 548-4717
From Boston, Rt. 128S, right onto Route 151 to Sandwich Road, left onto Carriage Shop Rd. Bear right at fork, farm on right. Open 7 days, 10-4pm. Hayrides, groups.
Coonamessett Farm
277 Hatchville Rd
E. Falmouth
(508) 563-2560
www.Coonamessettfarm.com
Rt. 28 south towards Falmouth; exit onto Rt. 151 east, turn south on Sandwich Rd. Proceed to Hatchville Rd and turn right, farm is 1 mile on right. 9-5pm, May through September. PYO Salad mix available year round. (Hydroponic Greenhouse) Membership required in PYO club, $15 annual family membership fee. Café featuring Coonamessett Farm grown produce. Canoe rentals for pond at Coonamessett Farm.

Berkshire County

Hilltop Orchard / Furnace Brook Winery
Route 295 - Canaan Road
Richmond
(800) 833-6274
www.Hilltoporchards.com
Mass Pike to Exit 1, to Route 41 North to Route 295 West, farm 3/4 mile on the right. Open Wed to Sunday, 9am to 5pm Labor Day until Columbus Day for PYO. Stand open 9-5pm. Containers provided, children welcome, picnicing and free hayrides on weekends. View cider mill and offer hard cider. Year round stand and bakery. New: Furnace Brook winery tours & tastings.
Howden Farm
303 Rannopo Rd
Sheffield
(413) 229-8481
www.Howdenfarm.com
3 miles south of center of Sheffield. At fork of Rt. 7 & 7A(1.7 miles) take 7A, then first right onto Rannapo Rd. We are first place on the left.
Pumpkins last weekend and holidays in Sept. thru all of Oct. 10-5pm.
Ioka Valley Farm
3475 Route 43
Hancock
(413) 738-5915
8 miles west from the intersections of Route 7 & 43. 4 miles east from the intersection of NY Route 22 & 43. Open weekends only. Mid September thru October for Pumpkins. 10am-5:30pm. Everyday during Strawberry season. 8-noon, 4:30-7:30pm weekdays, weekends, 8-4:30pm. Free hayrides provided to PYO pumpkin patch or Christmas tree plantation. Pure maple syrup year round. Visit farmstand and petting area.
Lowland Farm
129 New Marlboro Rd
Monterey
(413) 528-0728
Monterey, Rt. 23, 1 mile on New Marlboro Rd. Open 7 days when in season. -
Mountain View Farm
Old Cheshire Rd
Lanesboro
(413) 445-7642
From Allendale shopping center to Crane Ave., pass Jody Seasonal, right onto Oak Hill, which becomes Partridge Rd. Turn left at end of Partridge Rd and then turn right on Old Cheshire Rd. Farm is next right. Monday - Friday from 8am to 8pm for strawberries. Sat. and Sun., 8-5pm.In season, 12-5pm for tomatoes. May bring your own containers.
Taft Farms
Route 183 & Division Street
Great Barrington
(413) 528-1515
http:\\www.bcn.net\~taftfarm
Take Route 7 South from Stockbridge and follow signs to Rt. 183. 3/4 mile from Rt. 7 on Rt. 183. Call ahead for conditions and hours. Containers available or bring your own. Strawberries grown without pesticides.

Bristol County

Araujo Farms & Greenhouses
1460 Williams St.
Dighton
(508) 669-6988
Call for directions and hours.
Offer horse drawn hayrides & picnic area.
Cedar Hills Farm
Rt. 118
Rehoboth
(508) 252-6577
Route 44 to Route 118 South, farm is 1/10 mile on the left. Call for hours. Horse drawn hayrides.
Four Town Farm
90 George Street
Seekonk
(508) 336-5587
From 195, take exit 1 and follow Rt. 6 east to Cumberland Farms, turn right onto Warren Ave. for 1/2 mile then bear right at fork onto George St. 9-5pm depending on availability. Children must be supervised.
Oakdale Farm
59 Wheaton Ave
Rehoboth
(508) 336-7681
Route 44 to Lincoln Street, left onto Country, take 2nd right to Barney Ave. to 59 Wheaton Ave. Or Rt. 6 to Barney Ave- Left to Almeida Rd. to the end. Right onto Wheaton Rd. Call for picking times and conditions. Open May-October.

Essex County

Cider Hill Farm
45 Fern Ave.
Amesbury
(978) 388-5525
www.Ciderhill.com
Interstate 95 to Exit 1 in New Hampshire. Go West 2 miles Route 107 to Route 150. South 2 miles on Route 150, turn left onto Fern Ave. to barn and farm store. Or, Rt. 495 to exit 54. Turn right at bottom onto Rt.150. Go North through Amesbury. Turn right June: 8-6pm, July - Oct: 9-6pm, 7 days/week. Containers provided, children welcome if supervised. Offer children's play area, farm animals, a picnic area, and hayrides in the fall.
Clark Farm
163 Hobart Street
Danvers
(978) 774-0550
Take Centre Street Exit off Route 1 North. Turn left. 1/2 mile at blinking lights, Turn left onto Hobart Street. Farm 1/4 mile on left. Stand open daily from 9am to 6pm. Open for PYO: 9am to 5pm. Containers provided for a fee, children welcome.
Connors Farm
30 Valley Road (Rt. 35)
Danvers
(978) 777-1245
www.Connorsfarm.com
From downtown Danvers, Route 35 North to farm. Or from Route 1 North, take North Street exit, then turn left at only intersection. Also Rt. 128 to exit 23N. This is Rt. 35, we are 5 miles from this Jct. Open 7 days a week from 9am to 6pm. Containers are provided, children welcome. Picnic area and barnyard animals.Tour buses welcome!
Green Meadow Farms
650 Asbury Street
South Hamilton
(978) 468-2277
www.Gmfarm.com
Exit 20A off Route 128 to 1A North, go through North Beverly into Wenham, 1.5 miles past Wenham Lake take left after large white Church on left onto Arbor Street, go 2 miles to Asbury Street on left. Farm is 1.5 miles on left. Daily 9-6pm.
Homestead Farm & Orchard
13 Birchmeadow Road
Merrimac
(978) 346-8346
Rt.495 to exit 53. Left onto Rt.110, Birchmeadow Rd will be 1 mile on the right. Strawberries 8am-6pm. In season, apples & pumpkins on weekends only. Free hayrides to apple orchard. Containers supplied.
Ingaldsby Farm
14 Washington Street
Boxford
(978) 352-2813
1 mile off Route 133 in West Boxford. Stand open 8am to 6:30 pm daily. In season, apple picking on weekends after Labor Day 10am to 6pm. Containers provided, or bring your own. Children welcome with adults. Bakery included.
Long Hill Orchards
520 Main Street, Rt. 113
West Newbury
(978) 363-2170
Exit 57 off Route 95. Left off exit, farm is 4 miles on right. Seven days a week from 9-6pm. Including holidays. Greenhouse, ice cream, and petting farm. Containers available if needed. Beautiful views of the Merrimack River. Bring a picnic, enjoy the beauty. Horse drawn hay rides.
Marini Farm
259 Linebrook Road
Ipswich
(978) 356-0430
U.S. Route 1 to Linebrook Road, East toward Ipswich 1 mile, or Route 1A past center of Ipswich to Linebrook Road. Open 9am to 6pm daily. In season, open for PYO tomatoes 9am to 6pm.
Smolak Farms
315 South Bradford Street
N. Andover
(978) 682-6332
www.Smolakfarms.com
Route 95 to Route 97 Georgetown Exit. Left at Boxford Village sign to first right, Ipswich Road. Go 6 miles and look for signs. Stand open daily, 7am to 6pm. For all PYO, daily 9-5pm. Farm animals, hayrides in season, festivals, senior and educational programs, and host birthday parties, kids craft summer camp, farmstore bakery, functions.

Hampden County

Appleberry Farm
Barry Street
Agawam
(860) 668-7252
2 miles South on Route 187 from Feeding Hills Center, take right onto Barry St. Farm is on Barry Street @ Risings Corner. Starts mid-August, through mid-October on weekends.
Fini's Plant Farm
217 James Street
Feeding Hills
(413) 786-1012
Feeding Hills section of Agawam off North St. Sat. and Sun. from 9-5 in Oct. Weekdays by appt. only. Offer hay rides and childrens' events. Group rates for weekday field trips.
Kosinski Farm
336 Russellville Rd
Westfield
(413) 572-4344
Rt. 10 & 202 north from Westfield center. 5 miles left onto North Rd. Sept. and Oct., open 7 days, 7am to noon, except closed on Friday.
Provin Mt Farm
443 North West Street
Feeding Hills
(413) 786-0495
Exit 3 off I-91 in Springfield, take Rt. 57 west. 1 mile beyond Feeding Hills Center, turn right at light onto N. West St. Call for hours.
Pumpkin Valley Farm
384 College Highway
Southwick
(413) 569-6915
From Springfield take Rt. 57 west. At intersection of Rts. 10, 202 and 57, take 10 & 202 south. Farm is 1.5 miles on left. Open 9am to dusk daily, free hayrides on weekends and holidays.
Robert's Hillside Orchard
275 South Lane
Granville
(413) 357-6690
Call for directions and hours.

Westview Farms
111 East Hill Rd.
Monson
(413) 267-5355
Between Rts. 32 & 20. Exit 8 from Mass. Pike. East Hill Rd. is off Monson Rd. off Rt. 20. From Rt. 32 at Wing Med. Ctr. to Brimfield Rd. to East Hill Rd. April 1 thru Oct 30, Winter by reservation. Buses welcome. Dairy farm, 30 flavors of ice cream, goats, lambs, rabbits. Field trips for schools, day care & scouts, birthday parties: include horse drawn hay & sleigh rides, feeding the animals. Country fresh family fun.

Hampshire County

Fletcher Farm
22 Gunn Rd
Southampton
(413) 527-6888

Call for hours and conditions. Welcome school groups.
McCray's Farm
55 Alvord Street
South Hadley
(413) 533-3714
www.Mccraysfarm.com
1st left off Route 47 from center of South Hadley. Farm is 2 miles on right. Open daily, call for times and picking conditions. Hayrides to the pumpkin patch. Homemade ice cream, cornstalks, hay bales.

Middlesex County

Applefield Farm
Route 117
Stow
(978) 897-2699
3 miles west of Stow Center, farm is on Route 117. Open Monday through Sunday, 10am to 6pm. Open for PYO vegetables 9am to 5pm. Containers are provided, PYO vegetables include: beans, eggplants, peas, hot peppers, summer squash, kale & tomatoes.
Brox Farm
1276 Broadway Rd.
Dracut
(978) 454-3434
Rt. 93 to exit 46 to Rt. 113 west, 2.5 miles on right. Call for picking conditions and hours. Many other fruits & vegetables picked daily for farmstand.
Butter Brook Farm
982 Main St.
Acton
(978) 263-1936
www.Butterbrookfarm.com
From Boston Rt. 2 West to Rt. 27 North (Main St.) # 982. From 485 to Rt. 2 East to Rt. 27 North (Main St.) #982. Call ahead for hours and conditions. Saturdays 10am-4pm. Organic products. Also offer herbs and local honey.
Carver Hill Orchards
Brookside Avenue - Box 101
Stow
(978) 897-6117
Rts. 117 & 62 to Stow Center, left at lights, 1/2 mile to Brookside on left. Watch for signs. Open daily, 10am to 5pm. Open August until Christmas. Groups by appt., picnic tables provided. Wagon rides on weekends and can be scheduled for weekday groups.
Codman Community Farms
58 Codman Rd
Lincoln
(781) 259-0456
1/4 mile off Rt. 126 on Codman Rd. 8am-8pm daily, June thru Oct. Eggs, pork, beef and lamb for sale. Minor breeds of cows, sheep, chickens and pigs. Open for farm tours year round.
D.J. Hussey Farm
20 Burgess Road
Townsend
(978) 597-6891
Rt. 119 to Townsend center- north on Rt. 113 for 1/2 mile then left on Dudley Rd for 1.5 miles and look for signs. Call for hours and picking conditions.
Dowse Orchard
98 North Main Street
Sherborn
(508) 653-2639
www.Dowseorchards.com
From North/West: Mass Pike to exit 13, take Rt. 30 East to Rt. 27 South, follow through Natick center 2.5 miles into Sherborn on left. From East: Rt. 9 West into Natick and take Rt. 27 South into Sherborn. Call for hours and conditions. Apples September and October. Weekends only. "America's best crunchin Apples since 1778.
Drew Farms
31 Tadmuck Road
Westford
(978) 392-3449
www.Drewfarms.com
Route 495 to Exit 32, take right off exit to farm. Open daily 10am to 4pm. Children welcome, containers available. Trailer rides on weekends.
Hanson's Farm
20 Nixon Road
Framingham
(508) 877-3058
From 495 take route 20 East to Wayside Inn, at Wayside Inn Country Store turn right onto Hager Street, farm 2 miles on right. Or from Route 9 to Edgell Road, 1 mile to lights, left onto Edmunds Road, 2 miles to Nixon Road. Open Monday through Saturday, 9am to 6pm. Sundays, 9am to 5:30 pm.
Hillbrook Orchards
141 Old Ayer Road
Groton
(978) 448-3248
www.Hillbrookorchards.com
Route 2 West to Rt. 495 N, exit 31, west on Rt. 119 for 6-7 miles. After Mobil Station turn left onto Old Ayer Road, 1/2 mile to orchard. Call for hours and conditions. Also have pony rides, and farm animal petting zoo on weekends from 10am to 5pm.
Kimball Fruit Farm
184 Hollis Street
Pepperell
(978) 433-9751
Exit 5 West off Route 3, North to Route 111 into Pepperell, take right at yellow blinking light, farm is 3 miles on left. Daily 9am to 6pm. Containers provided.
Lawndale Farm
91 Frost Rd
Tyngsboro
(978) 649-7629
From center of Tyngsboro (at bridge), take Rt. 3A north towards Hudson, N.H.. We are 1 mile from bridge, 1st farm on road. Daily from 10am-7pm
Marino Lookout Farm
89 Pleasant Street
South Natick
(508) 651-1539
www.Lookoutfarm.com
1 mile from Route 16, South Natick Square. Call ahead for hours. In season, every day, 10-5pm. Children are welcome with parental supervision. Farm animals on display.
McLoon Farms
Corner of Route 113 & Thorndike
Dunstable
(978) 649-3656
From Route 3 take Exit 35. Rte. 113 West towards Pepperell, 1/4 mile on right, look for large old barn. Open weekdays from 10am until dusk. Fresh organic produce and crafts also. Breads and pies.
Parlee Farms
Farwell Road
Tyngsboro
(978) 649-3854
www.Parleefarm.com
Route 3 to Exit 34, Westford Rd, Tyngsboro. Go .75 miles East to Route 3A, take left at light, then 2nd right onto Farwell Rd. Farm is 1 mile down on right. For blueberries, raspberries, apples, flower, and pumpkins, call ahead for hours and conditions. Strawberry picking daily from 7am-6pm. Mary's Country Kitchen offers fresh fruit desserts and ice cream. Annie's Animal Barn offers animals to feed and pet.
Patenaude Farm
158 River Street
Dunstable
(978) 649-7116
Rt. 113 to East Street in Pepperell Mass. Then follow the PYO Pumpkin signs. Everyday from Sept. 10th to Oct. 30th. 10am - 6pm.
Pickard Farm
160 Great Rd
Littleton
(978) 486-4141
Exit 31 off 495, 1.25 miles east on 2A. - -
Shelburne Farm
106 West Acton Road
Stow
(978) 897-9287
Route 2 West to Rt. 111. Left at second light. Next block, bear right onto Willow St. Farm is 2.5 miles on right. Starts late August, Daily 9-6pm. Farm store open until Christmas.
Spence Farm
30 Wyman Street
Woburn
(781) 933-4847
Route 128 to Exit 35, take Route 38 South to 2nd set of lights, right onto Wyman Street, farm is .5 miles on right. Open for picking daily 9am to 4pm. Call ahead for picking conditions, supervised children welcome.
Spence Hill Farm
39 Coolidge Street
Sherborn
(508) 653-8939
Call for directions. Call for hours and conditions.
Sunshine Farm
135 Kendall Ave
Framingham
(508) 655-5022
Off Speen Street, Natick, 3 miles South. Exit 13 off Mass Pike, 2.5 miles South of Route 9, Natick. Take Speen Street to end, right onto Kendall Ave. Raspberries on weekends in September, 10am to 4pm. Call ahead for information in June for strawberries. Call ahead for pumpkins. Containers provided, children under 10 must be accompanied by adults. Shortcake and ice cream available at our Dairy Bar. Fall raspberries only.
Verrill Farm
11 Wheeler Road
Concord
(978) 369-4494
www.Verrillfarm.com
Located between Rt. 117 and Rt. 2 on Sudbury Rd, or take Rt. 2W to intersection after 126, left onto Sudbury Rd. Call for hours and conditions. Containers available or bring your own. Mass. Specialty foods, bakery, and kitchen which offers soups, entrees, pies. Restrooms, handicapped accessible, tented area for picnics.

Norfolk County

Fairmount Fruit Farm
887 Lincoln St.
Franklin
(508) 533-8737
Rt. 109 to Village St. (Medway) Take Sandford St. over Charles River which becomes Lincoln St. Or, Rt.140 to Main St Franklin, which turns into Lincoln St. 3-4 miles on right. Apples start 2nd weekend in Sept. Hours: 10-4:30pm
Jane & Paul's Farm
33 Fruit St.
Norfolk
(508) 528-0812
Route 115 to Cleveland St., turn left onto Fruit St. Open June to Nov., call ahead for hours and availability.
Lakeview Farms
Rt. 126, 1048 S. Main St.
Bellingham
(508) 883-3800
Rt. 495 to Rt. 140 North to Rt. 126 (Franklin/Bellingham).
Hayrides, farm animals including Obi the llama.
Tangerini's Spring Street Farm
139 Spring Street
Millis
(508) 376-5024
Spring St. is off Rt. 109. Follow 3/4 mile, driveway on right. 9-4pm end of Sept. to end of Oct. Sat. and Sun. for pumpkins. Strawberries, early June. Childrens birthday parties, and field trips available April til mid-Nov.
Ward's Berry Farm
614 South Main Street
Sharon
(781) 784-3600
Take Exit 8 off Route 95 South and go .5 miles East towards Sharon. Or from Cobb Corner, go about 5 miles West, straight through Sharon center. Fields open every day except Wed., 9am-6pm. Free hayrides to the strawberry patch.

Plymouth County

C.N Smith Farm
325 South Street
E. Bridgewater
(508) 378-2270
Off Route 106 East, turn right before Old Colony YMCA onto South Street. From Rt. 24 take Rt. 106 East. From Rt. 3 take Rt. 106 West toward E.Bridgewater, turn onto South St. At YMCA, go to end. You are there! Open daily from 9am to 4pm. Call for conditions and information. Pumpkin picking on weekends.

Worcester County

Arrowhead Acres
92 Aldrich Street (Route 98)
Uxbridge
(508) 278-5017
www.Arrowheadacres.com
Rt. 146 south from Worcester area to Chockalog Rd exit in Uxbridge. Follow Rt. 146A south 1/2 mile to Rt. 98 on right. Farm on Rt. 98 1/4 mile on left. Open for pumpkins weekends, Noon to 5pm. Open for Christmas Trees. Also offers hayrides, petting farm, picnic area, function facilities.
B & B Farms
Box 105 or Route 67
New Braintree
(978) 365-4027
On Route 67, at corner of Old Turnpike Road. Second location: 20 Greenland Rd., Sterling, MA. Off Rt. 12. Open all day and on weekends for strawberries, blueberries, and pumpkins. We have pesticide free produce in season. Families and groups welcome.
Bolton Spring Farm
149 Main Street - Route 117
Bolton
(978) 779-2898
2 miles East of Exit 27 off Route 495 on Route 117 near the Stow/Bolton line. Open daily 9am to 6pm, starts Labor Day for apples, 3 weeks later for pumpkins. Containers provided, children welcome, groups by appointment on weekdays. Picnic tables provided, country farmstand with homemade hot dumplings, pies, and donuts.
Breezy Gardens
1872 West Main Street
Leicester
(508) 892-9201
Mass Pike to Route 20 East, to Route 49 North, to Route 9 East. Farm is 5 miles on left. Farm is located on Rt. 9, at the Leicester/Spencer line. Open daily, 10am to 6pm. Farmstand open daily, farm animals. Hay rides September and October.
Carlson Orchards
115 Oak Hill Road, Box 359
Harvard
(978) 456-3916
www.Carlsonorchards.com
Route 2 West to the Ayer/Groton Exit 38B onto Rt. 110N, 1/4 mile take ist right-Poor Farm Rd, follow signs, 2.5 miles. From Rt. 495 take exit 28 to Rt. 111 towards Harvard. 1/4 mile, follow signs. Apple PYO hours are 10am-5pm, 7 days a week. Peach and Nectarines: Call, Mid-July on, 10-5pm. We supply containers. Cider mill.
Charlton Orchards
44 Old Worcester Road
(RT. 20)
Charlton
(508) 248-7820
www.Charltonorchard.com
Rt. 20 West 6 miles from Rt. 395 and Rt. 290, look for signs. Rt. 20 East, 4 miles from Mass. Pike, Sturbridge exit and Route 84. Follow signs. PYO berries starts June. Offer picnic tables, wagon rides during apple season. Peach Festival in August. Harvest Festival in October and Christmas at Charlton Orchards first week in December. Strawberry Festival in June, Blueberry Festival in July.
Clearview Farm
4 Kendall Hill Road
Sterling
(978) 422-6442
Take Route 12, Route 62, or Route 190 to Sterling Center, go 1/2 mile up Maple Street, take right onto Kendall Hill Rd, farm 1st on left. Open 10am to 6pm weekends w/hayrides. 11-5pm weekdays. Groups by appointment.
Douglas Orchard
36 Locust Street
E. Douglas
(508) 476-2198
Follow signs from the corner of Main Street and Depot Street, 3 miles to farm. Open daily 10am to 5pm. Children are welcome with adult supervision, containers provided.
Fay Mountain Farm
12 Cemetery Road
Charlton
508-248-6916
faymountainfarm.com
visit website or call for more info.

George Hill Orchards
582 George Hill Road
S. Lancaster
(978) 365-4331
YourFavoriteFarm.com
Rt. 2 to the Lunenburg/Lancaster exit 35, take Rt. 70 South 3.5 miles, right onto Rt. 117 west, 3/10 mile turn left onto Langen Road, 1.7 miles turn right onto George Hill Road. Open Monday through Sunday, 9am to 6:00 pm, closed Saturdays. School groups by appointment on weekdays. Apple Tree Theater, wagon rides, refreshments, pony rides, animals and cider press viewing on Sundays and holidays only.
Great Oak Farm
227 Highland St.
Berlin
(978) 838-2097
Exit 26 off Rt. 495, head west on Rt. 62 for 1.5 miles to center. Take right onto Carter St. to Highland St.. Farm is 1.7 miles from Rt. 62. Mid June to Oct. Open Tuesday-Saturday: 8am-noon and 3-7pm. Sundays, 10am-6pm.
Harvey's Farm & Country Store
120 South Street (Route 135)
Westboro
(508) 366-1545
www.Harveysfarm.com
One half mile East on Route 135 towards Hopkinton from the rotary in downtown Westboro. 10-5pm daily. Visit our barnyard critters.
Hyland Orchard & Brewery
199 Arnold Road
Sturbridge
(508) 347-7500
www.Hylandbrew.com
Off Rt. 20, just west of Old Sturbridge Village, take Arnold Rd. and follow 2 miles. Sept. 2 - Oct. 29, Sat & Sun, 9am-Dusk. Offer tours of micro-brewery, farm bakery and ice cream. Animal attraction. Free admission.
Keown Orchards
9 McClellan Road
Sutton
(508) 865-6706
www.Keownorchards.com
From Providence: Rt. 146 N to Central Turnpike exit. Follow signs towards Northbridge, take 2nd left at Dodge Hill Rd to 1st right onto McClellan Road. Or: Mass Pike to exit 10A (Rt.146) South to Central Turnpike exit, follow signs. Call for hours of operation and picking conditions. Also visit our farmstand open daily.
Nampara Farm
3 Bemis Rd.
Hubbardston
(978) 928-4489
www.Nampara.com
Rt. 2A west into Westminster; take left onto South St., follow for 6 miles and follow signs. Or, Rt. 68 west towards Gardner, at Hubbardston center take a right onto Brigham St. and follow for 2.5 miles and then follow signs to farmstand. 7 days a week 6am-6pm. Grand opening April 24th. Bakery on site with homemade bread & pastries. Also offer jams, soap, and candles.
Nourse Farm
70 Nourse St.
Westboro
(508) 366-2644
www.Noursefarm.com
2.5 miles west on Rt. 30 from Westboro center. Follow the strawberry to the field. Map on website. June 10 to Sept. 30, please call for hours. Offer 8 of the sweetest varieties of strawberries and 3 varities of raspberries.
Red Apple Farm
455 Highland Ave.
Phillipston
800-628-4851
www.Redapplefarm.com
Route 2 (exit 19), follow signs (2 miles) to farm. Open daily, 9am to 6pm. Nov. and Dec. from 9am-5pm. Containers provided, children welcome, farm animals, forest trails and hayrides, school tours, 48 apple varieties with one tree with 108 varieties grafted on it! Host Birthday parties, and company outings.
Rota Spring Farm
Chase Hill Road
Sterling
978-365-4735
Look for signs off Rt. 62 or Rt. 110. Call for details. April, May - 7days, Noon-9pm.
June, July, Aug. - 7 days, Noon-10pm.
Sept. - 7days, Noon-9pm.
Oct. - 7days, Noon-8pm.
Farm Stand offering homemade ice cream, sweet corn, tomatoes, cukes, eggplant, summer squashes, peppers, raspberries, winter squash, pumpkins. Petting zoo with goats. Customers can enjoy watching cattle while picnicing and eating ice cream!
Schartner Farm
211 West Berlin Road
Bolton
(978) 779-5588
Route 495 to Exit 27. Take Route 117 West 1 mile, turn left at blinking light. Go 1 mile up hill, take 3rd left onto West Berlin Road, farm 1 mile. Sat. & Sun, 10-5pm. Sept. til October Over 100 acres, enjoy a picnic.
Sholan Farms
1125 Pleasant St
Leominster
978-840-FARM
Rte 2 to Rte 12 S (N. Main St.). Stay on Rte 12 to center of town (past Post Office on right through lights). Pleasant St. is straight ahead. Continue on Pleasant (past the #6 Red Schoolhouse); approx. 1/2 mile to the top of the hill
Offer entertainment, hayrides and group tours. We are located on 169 acres overlooking Northern Worcester County.
Stillman Farm
1399 Lancaster Ave.
Lunenburg
(978) 537-3342
From Rt. 2: take the Lunenburg/Lancaster exit, turn left onto Leominster/Shirley Rd, bear right onto Lancaster Ave. toward Lunenburg. Open daily 9am to 7pm.
Stowe Farm Orchards
15 Stowe Road
Millbury
(508) 865-4818
Take Milbury Exit off Route 146 and follow signs, approx. 2 miles. Starts mid-September to end of October, weekends 10am to 5pm. Containers available.
Tougas Family Farm
Ball Street
Northboro
(508) 393-6406
www.Tougasfarm.com
Rt. 290 to Exit 24, (Church St.) turn towards Boylston. First right onto Ball St. Farm is 1.5 miles from Rt. I-290. Call for hours. Vary with season. Farm includes a bakery featuring fresh made fruit desserts, ice cream, and refreshments. Children's play area and barnyard animals. Offer school programs.
Wade Orchard
62 Westcott Road
Harvard
(978) 456-3926
www.Wadeorchard.com
Route 2 to Rt. 111. Follow signs just beyond Rt. 495. Take Codman Hill Rd. off Rt. 111. Follow to stop sign, turn right onto Stow Rd. Take first left onto Westcott Rd. Farm on left. Only 1.5 miles from Rt. 111 & 495. Open 7 days a week, 9am to 4:30pm - Open Sept. 1. Offer cider, preserves, gourds, peaches, plums, and asst'd vegetables.
Westward Orchards Farm
Mass Ave. Route 111
Harvard
(978) 456-8363
www.Westwardorchards.com
1/4 mile West of Route 495 on Route 111. Visit our second location located across from the Fruitlands Museums on Prospect Hill Road. Open weekends only from 10am to 4pm in season. Call for more information. Open daily 10am to 6pm. For PYO apples open 10am to 4pm. Closed Tuesdays. We supply containers. No pets. Also visit our retail farm store.
Woody's Fall Farmstand
76 Brown Ave.
Leominster
(978) 537-9424
From Rt.2, take Rt. 13 north (exit 32) for 1/4 mile, then right on Prospect St. for 1.5 miles to Brown Ave. Labor Day thru Halloween, daily and weekends, 9-6pm. All fall décor, our own mums, gourds, hay, straw, cornstalks, and indian corn. Feed farm animals, see giant pumpkins, and scenic hill walk.


The BIG BIG Halloween Library Collection

The BIG BIG Halloween Library Collection


Electronic Luminaries

http://www.flicluminaries.com/index.html

Charming, Traditional & Beautiful is the way FLIC Luminaries will appear to your friends and neighbors.

FLIC Luminaries radiate a warm glow using either votive candles with our long burning candle holder, electric light bulbs, or our new LED Votive Candles.

Create a magical and festive feeling in the garden or on the porch with FLIC Luminaries. Your patio or pool will glimmer with a warm flickering glow for parties, family celebrations, and every holiday.

FLIC Features

  • Traditional shape & style
  • Beautiful warm glow for every occasion
  • Weatherproof, Durable, & Reusable
  • Timesaving - easy to install and store
  • FLIC supports charities that have memorial and awareness walks for their causes. Please contact us to see if FLIC Luminaries can aid in your project. Click here to read more about our Fundraiser packages.

    If you would like to become a dealer of FLIC Luminaries or if you are intersted in puchasing large quantites of FLIC Luminaries, see our Wholesale Purchaser Program.


    Outdoor Luminaries by Carol Duvall

    Outdoor Luminarias


    Though we often think of putting out luminarias at holiday time, there's no rule that says that's the ONLY time. And it certainly isn't necessary to line the entire front walk or driveway. A few at the front door or lining the porch steps can look pretty and say "welcome" any time of the year. I came to this conclusion when my daughter-in-law put four lighted candles at the front door one evening in October when I was invited to dinner. What a nice way to be greeted.

    For the luminarias I made today, hardware cloth and tissue paper were my materials of choice, and though the tissue paper seems to be too fragile to use for outdoors, it is well-coated with polymer medium (decoupage medium) so it is well-protected from the elements.

    Materials:

    1/4- or 1/8-inch grid hardware cloth
    tissue paper
    matte finish polymer medium, decoupage medium or Mod Podge
    scissors and/or wire cutters
    needle nose pliers

    Note: Though a couple of the luminarias I showed had been rubber stamped and embossed and one had sticky-backed metallic charms attached, any decorating should be kept to a minimum. Patterned tissue should also be used with discretion. The tissue is placed over a gridded wire that shows through when the candles are lit, so too much decorating can easily be too much. You can test this ahead of time to see the effect.

    Hardware cloth is available at the hardware store as well as at home remodeling stores. If you use the 1/8-inch grid, be sure to check to see that the wires are straight. This was not meant to be a "beauty" product.


    Photo

    Outdoor luminaries

    Photo

    Place these luminaries on the front porch at dusk to greet a dinner guest.

    Photo

    Figure A


    Using the 1/4-inch grid hardware cloth

    1. Cut a length of the 1/4-inch hardware cloth as wide as you want the luminaria to be, high enough and long enough to make four equally-sized sides. Ours meaure 12 inches long (three inches on each side of the luminaria) and stands eight inches high. Cut the wire so that it is smooth on both the top and bottom edges with no short ends of wire jutting out (figure A). Though scissors can be used, wire cutters are preferable. On the short ends, cut the cloth so that one end is smooth and the other end has all of the wire "spokes" protruding their full length of 1/4 inch (figure B).
    Photo

    Figure B

    Photo

    Figure C

    Photo

    Figure D


    2. Mark the length of the wire at three-inch intervals and fold along these lines. Insert the protruding wires on one end and through the matching openings on the other end (figure C). Bend each wire back using needle nose pliers. Press each wire down so there are no rough edges.

    Note: It is easier to get sharp folds by folding the wire back against the edge of a ruler or fold over the edge of a tabletop (figure D).

    3. When the wire has been assembled into a box-like shape (figure E), cut a length of tissue about one inch wider than the height of the wire (nine inches) and long enough to go around with just a slight (1/2-inch) overlap.


    Photo

    Figure E

    Photo

    Figure F

    Photo

    Figure G


    4. Place paper on a tabletop on a piece of waxed paper or foil and coat several inches of it with the polymer (figure F). Pick up the tissue carefully so as not to tear it and press it against the wire, positioning it so that 1/2 inch extends beyond both the bottom and top edges.

    5. Continue to coat the tissue and wrap it around the wire (figure G). When it covers the entire rectangle of wire, fold the top and bottom edges of the paper to the inside of the luminaria. Smooth everything as much as possible. When dry, you may wish to go back and give a second coat of the polymer to the tissue, although this is not essential.

    6. Place a votive candle inside the cover and light at dusk.

    Tips:

    • If you have difficulty getting the tissue up off of the tabletop and onto the wire without tearing it, try placing it on the wire one side at a time and applying the polymer.
    • When using the 1/8-inch hardware cloth, cut the wire along all four edges as smoothly as possible so no spokes are sticking out. Cut the wire about one inch longer than you need and fold one end in 1/2 inch. Fold the other end out 1/2 inch and join the two ends by fitting one fold inside the other. If using this method, it is easier to make the joining in the middle of a side panel or to make a cylindrical cover rather than a rectangle.
    http://www.hgtv.com/hgtv/dc_furnishings_other/article/0,1793,HGTV_3433_1387619,00.html

    Saturday, July 01, 2006


    Drawstring Bags and Purses

    Drawstring Bags and Purses

    from... http://www.trystancraft.com/martha/projects/bags.html

    Materials:

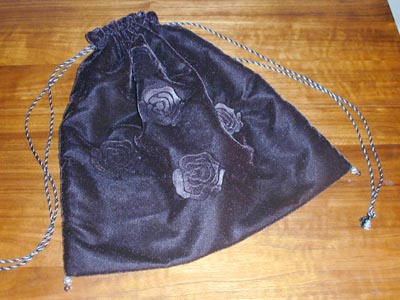
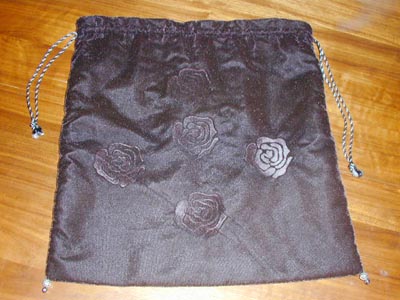
    Drawstring bags make great little purses or lovely wrappings for gifts. You can decorate them in a myriad of ways or leave them simple.

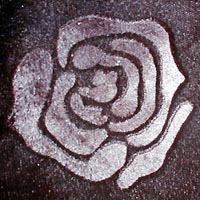
    In the bag pictured, I used black velvet for the outside and black satin for the inside. I also stamped the velvet with a rose design. You can decorate the outside fabric with embroidery, patchwork, quilting, ribbon, lace, appliques, fabric paint, etc. Or just use scraps of pretty fabric leftover from another project (or from the remnant bin at the fabric store). Satin and other slick fabrics make good lining materials.

    Start with a long rectangle of fancy fabric. Fold it in half and trim the three unfolded sides to form a square. If you are using this as a gift bag, use the size and shape of your gift as a guide. For example, these bags are perfect wraps for wine bottles. Lay the wine bottle on the fabric with the bottom of the bottle two inches above the fabric fold. Measuring two inches on each side of the bottle, cut along the two long sides of the bottle. Then add four or more inches above the top of the bottle, and cut that side. Cut the same shape out of the plain fabric for your lining.

    Now that you've cut the fabric shape, it's time to decorate the outside fabric. Add any embellishments you choose now. If you sew on trim or ribbons in horizontal lines, make sure to extend the trim to the very edge of the fabric. This way, it will be enclosed in the final seam and give a clean finish.

    With right sides together, sew the outside fabric's side seams. Then sew the side seams of the lining fabric. Iron these seams open.

    Turn the lining right-side out and place it inside the fancy fabric so that the right sides of each piece are facing each other (the wrong sides will be facing you). Match the side seams, and pin the open top edges together. Sew along the top edge and leave an opening of about two inches (more for a bigger bag, less for a tiny bag). Turn the bag right-sides out through this opening. Push the lining (right-side out) inside the fancy fabric side. Iron the top edge, turning the raw edges of the opening down. Hand-stitch the opening closed.

    Now you'll make a casing for the drawstring. An inch or so from the top edge of the bag, stitch a line through the two layers (lining and outer fabric), all around the bag. If you want more of a ruffled edge at the top of the bag, start this line of stitching farther from the top edge. Then stitch another line about a half inch below the first line.

    At both side seams, use a seam ripper to unpick the side stitching in between the two lines of casing stitches. Cut the cord or ribbon into two long, equal pieces. Take a safety pin and attach it to one end of one piece of cord or ribbon. Insert the safety pin into the side-seam hole and thread it through the casing all the way around the bag, until it comes out next to where it started. Do the same with the other piece of cord or ribbon, but start at the opposite side. On each side, knot the cut ends of the cords to each other.

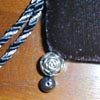
    If you wish, you can sew beads or tassels at each corner of the bag. Use a needle and thread, and start from the inside of the bag so the knot is hidden. You can string any number of beads at each corner, or just tack on a pretty tassel.


    Stamped Velvet

    Stamped Velvet

    at.... http://www.trystancraft.com/martha/projects/stampvelvet.html


    Stamped Velvet

    Materials:

    Stamping velvet is a wonderful way to customize a project or gift. You'll need a few, rather specific tools, but once you have them, you can make all kinds of beautiful things!

    The Velvet: This technique only works on cut velvet, not crushed velvet, panne velvet, stretch velvet, or velveteen. You need the deep pile of a cut velvet. Rayon or rayon-blend cut velvet is the most common variety at fabric stores and works perfectly. Expensive silk velvet is not necessary.

    The Stamps: In order for the design to show up, it must be a large, chunky style design. Delicate tracery and fine details will be lost in this process. The design must have thick lines and solid areas. Look for stamps made for fabric stamping or fabric painting. Hot Potatoes makes a whole line of stamps intended for fabric paint and stamping. Their catalog will give you a good idea of what to look for in a velvet stamp.

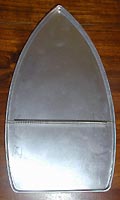
    The Iron: The best type of iron to do this project is one that doesn't have very many steam holes or that has steam holes only around the edge of the bottom plate. Steam holes will make holes in your stamped design. If your iron has lots of steam holes, you'll need to be more careful of where you place the iron in relation to the stamp design. Also, you might consider buying a Teflon iron cover, also called a fabric shield for velvet stamping. This is a simple cover that fits onto your iron with a spring.

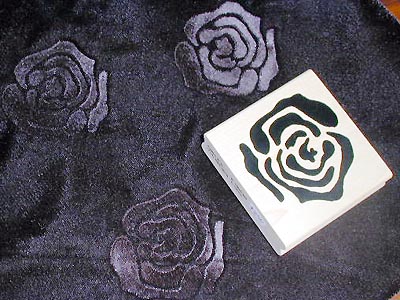
    To start stamping, turn off the steam on your iron and set it on a linen or high setting. Place a hard-backed book or other hard surface on your ironing board. Put the rubber stamp on top of it with the rubber facing up. Lay your velvet over the stamp, with the right side of the fabric (with the pile) touching the rubber.

    When positioning your velvet, consider where you want the stamped design to show on the final item. If the velvet will be for clothing, make sure the design won't be caught in a seam. If you want a stamped border, place the design near the edge, but leave enough room to hem the velvet. Consider the size and shape of the final item -- sometimes it's easier to stamp before you sew, sometimes it might not be.

    When the velvet is positioned on the stamp, mist the back of the velvet lightly with water. Now firmly press the iron on top of the velvet and stamp. Hold for 15 seconds. Lift the iron off, turn the velvet over, and you'll see the stamped design!

    Warning: You can't wash stamped velvet! Water will ruin the design. As with any cut velvet, you should only dry clean it.


    Stamped Candles

    STAMPED CANDLES

    from... http://www.trystancraft.com/martha/projects/candles.html


    Stamped Candles
    Materials:
    Embossing tools can be found with rubber-stamping supplies at craft stores. They're also sold as paint strippers. The tool costs about $20 to $30, and it's a very worthwhile investment if you do any type of stamped projects. With the tool and powder, you can get an raised texture that's very elegant on paper and makes this candle project possible. Embossing powders are only a dollar or two each, and they come in a rainbow of colors including fabulous metallics. Make sure to get some clear embossing powder because it works with every color of ink and always comes in handy.

    To decorate candles with stamps, first stamp a design onto tissue paper. Rubber stamps with bold, clear lines or solid shapes work better than very finely detailed stamps. The embossing can smudge together fine details. Pigment ink is the best for embossing because it stays wet longer than ordinary ink. You can use ink the same color as the embossing powder or use different colors which may give unusual effects. Use tissue paper that is the same color as your candle or a shade lighter. This will keep the paper from showing. White paper on white candles is the easiest, but dark colors can work too.


    Work with the embossing powder over a sheet of computer paper -- this will make it easier to pour excess powder back into the jar. After you've stamped the design, pour embossing powder over the wet ink, making sure to cover the whole design thoroughly. Then shake off excess powder. Use the heat gun to melt the embossing powder and create a raised design. Cut out the embossed image as closely as possible.

    Place the embossed image on the candle. If the paper won't stay put, you can wet the edges of the paper a little to make it stick, or use a tiny bit of glue to hold it down. With the embossing tool held four to six inches away from the candle surface and directly above the tissue paper, gently warm the area over the stamped image. Do this carefully, until the wax slowly melts and absorbs the tissue paper, then turn off the heat. The design will then appear to blend into the candle.

    After all your stamped images are on the candle, the candle surface may have some drips and bumps or the melted areas may just look too noticeable. You can smooth this out by gently running the embossing tool over the whole candle, holding the tool about six inches away from the candle. Move the tool (or the candle) around to redistribute the wax as it melts. Be careful not to reheat the areas where your stamped images are -- the wax can loosen and the tissue paper may slip around. By gently warming the candle all the way around, you can get a soft, almost hand-dipped look.


    Remember, you're working with hot wax so keep your fingers away from the end of the embossing tool and tilt the candles so that any wax won't drip on you! Also, cover your work surface with paper to protect it from melted wax.


    Curtains and Ichabod Crane

    CURTAINS

    found this at... http://collectibles.about.com/od/halloween/ss/halloweenzinn02_6.htm


    Department 56 Haunted Village


    Sleepy Hollow and Icabod Crane


    Which is Front?

    http://www.piercehouse.com/Images2/Pierce%20Houseback.jpg


    http://www.piercehouse.com/fall/fall_13.jpg


    The image “http://www.piercehouse.com/Images1/Housefront.jpg” cannot be displayed, because it contains errors.


    Ben and Jerry's Skeleton and Witch

    .....
    http://interiordec.about.com/gi/dynamic/offsite.htm?zi=1/XJ&sdn=interiordec&zu=http%3A%2F%2Fwww.benjerry.com%2Ffun_stuff%2Fholidays%2Fhalloween%2Fcrafts%2Findex.cfm


    Make your own Halloween decorations. Print out these craft pages, color them, cut them out and fasten them together to make your own Ben & Jerry's Halloween decorations. Stick them in your office, your classroom, your car, put them everywhere. Stuff you'll need:

    Directions
    Print the image. Color your decoration; it's easier to color before you cut it out. It's a good idea to glue several sheets of paper together or glue the print out to a piece of cardboard to make it stronger. Carefully cut all along the heavy outline of the images. There are extra arms and feet so you can put your Halloween figure into different positions. If you want your decoration to be poseable, use a hole punch to punch holes into the white circles at the joints. Line up the holes and push a paper fastener through. Bend the back clips of the fastener to secure it. If you don't want your decorations to be poseable or if you don't have any paper fasteners) glue the arms and legs into the desired position.

    Be creative, be original. Make some other accessories. That skeleton would be stylin' with a top hat and the outfit Glynda is wearing is just crying out for a cape.

    The links below will open in a new window to make printing easier.


    The image “http://www.benjerry.com/assets/images/fun_stuff/holidays/halloween/crafts/skeleton.gif” cannot be displayed, because it contains errors.


    The image “http://www.benjerry.com/assets/images/fun_stuff/holidays/halloween/crafts/glynda.gif” cannot be displayed, because it contains errors.


    Haunted House Template from Ben and Jerrys

    Haunted House


    http://www.benjerry.com/assets/images/fun_stuff/holidays/halloween/crafts/victorian.gif


    Gauzy Ghost

    from...
    http://interiordec.about.com/gi/dynamic/offsite.htm?zi=1/XJ&sdn=interiordec&zu=http%3A%2F%2Fwww.marthastewart.com%2Fpage.jhtml%3Bjsessionid%3DFYWTGJ24CLPNHWCKUU2SGWWYJKSS2JO0%3Ftype%3Dcontent%26id%3Dtvs3522


    Gauzy Ghosts
    Historically, the Celts celebrated Halloween to appease the god of the underworld, who would release the souls of the dead to congregate among the living on October 31. Over time, the familiar white sheet of the ghost has come to symbolize Halloween as universally as Santa does Christmas. A shrouded ghost knocking on your door may not be very frightening, but it still evokes an evening of candy and fun.

    Just because you aren’t out in costume yourself doesn’t mean that you can’t conjure up some of the spirit of the evening. With a solution of glue and water, a few Styrofoam balls, and some gauze, you can make an attractive and ghostly Halloween decoration.
    TECHNIQUE
    Making Gauzy Ghosts
    3- or 6-inch Styrofoam balls
    Jars
    Elmer’s glue
    Gauze
    Scissors
    Darning needle
    Monofilament

    1. In an open, safe work space (this project can become messy), hold the Styrofoam ball steady by placing it on top of a jar whose neck is narrower than the ball.

    2. Mix a solution of 3 parts Elmer’s glue to 1 part water.

    3. Cut the gauze into squares that fit over the ball with enough extra gauze to hang below the ball for a true ghostly appearance.

    4. Dip each gauze square into the glue mixture, squeeze out the excess, and drape it over the Styrofoam.

    5. Allow the ghosts to dry for about 4 hours before removing them from the jars.

    6. Use a darning needle to sew a piece of monofilament into the center of the ghost’s head, tying a knot on top. Hang the ghosts, or stand them up.
    SOURCES
    Gauze
    Available at local craft and fabric stores


    Yet More Recipes & Fun Facts

    from.. homestead.com/WinterSteel/Halloween.html

    ~*Pumpkin Bars

    Yields 12 pieces.
    3/4 cup flour
    3/4 teaspoon salt
    1/2 teaspoon baking soda
    1/2 teaspoon nutmeg
    1/2 teaspoon cinnamon
    2 eggs
    1 cup brown sugar
    2/3 cup canned pumpkin
    1/4 cup cooking oil
    1/2 cup nuts

    In a bowl beat eggs and sugar. Add oil and mix until combined. Then add the dry sifted ingredients together with the pumpkin and nuts. Pour in 1/4 sheet (12" x 8") greased baking pan.

    Bake at 350 degrees for 30 minutes. Cool 5 minutes. Remove from pan and frost, if desired. Cut into 2" x 4" squares. Enjoy...


    ~*PINA GHOULADA

    A frothy drink is tempting enough, but one served in a red-rimmed glass is particularly enticing to monsters who drink blood. Corn syrup with food coloring tinges the classic piña colada with a devilish sweetness.

    Dip the rim of each glass into the red mixture, spinning slowly to coat (below, right). Turn glasses upright; the red liquid will drip slightly, then set. Pour drinks, and serve. Drinkers' lips may be stained pinkmuch like those of a sated vampire.

    Recipe
    Makes 10 to 12 eight-ounce servings
    The ghoulada mixture can be made several hours in advance and chilled.
    3 tablespoons corn syrup
    1/4 teaspoon red food coloring, plus more for rims
    20 ounces pineapple juice
    1 fifteen-ounce can cream of coconut
    1/2 cup heavy cream
    1 cup orange juice
    10 ounces good-quality rum (optional)

    1. To coat rims, pour corn syrup into a shallow bowl. Dip a toothpick into food coloring, and stir a very small amount into corn syrup to combine. Hold a glass by the stem, dip rim into the syrup mixture, and turn glass, coating entire rim. Turn the glass upright, allowing mixture to drip down sides. Dip the remaining glasses. Set aside.

    2. In a bowl, whisk together remaining ingredients, including 1/4 teaspoon red food coloring. Place 2 1/2 cups ice cubes in a blender, and add 1 cup drink mixture. Blend until smooth; add more pineapple juice if mixture is too thick. Repeat with remaining drink mixture and ice. Carefully pour into prepared glasses; serve.

    Source: Martha Stewart Living Omnimedia Inc.


    ~*THE DEVIL'S SALSA & TORTILLA SPIKES
    Get your Halloween party off to a spicy start with The Devil's Salsa and Tortilla Spikes.

    *THE DEVIL'S SALSA
    Makes about 5 cups

    The spiciness of this salsa will vary, depending on the heat of your peppers. Add a little at a time, until it's as spicy as you like.

    2 ears corn, kernels shaved from the cob
    3 tablespoons olive oil, plus 1 teaspoon for baking sheet
    1 orange bell pepper
    1 fifteen-and-a-half-ounce can black beans, rinsed and drained
    1 mango, peeled, pitted, and cut into 1/4-inch dice
    1 hot red pepper, seeded and finely diced, or more to taste
    1/2 red onion, finely diced
    Juice of 2 limes (about 5 tablespoons)
    1 teaspoon salt

    1. Heat oven to 450°. Place corn on a baking sheet brushed with 1 teaspoon olive oil, and roast until the kernels begin to brown, about 10 minutes. Set kernels aside to cool.

    2. Place pepper directly on a lit gas burner; roast, turning with tongs, until charred on all sides. Transfer to a bowl; cover with plastic wrap. When cool enough to handle, wipe off charred skin with a paper towel, and remove stem and seeds. Chop into 1/4-inch dice; place in a large bowl.

    3. Add corn, beans, half the diced mango, hot red pepper, onion, lime juice, remaining 3 tablespoons oil, and salt; toss to combine.

    4. Finely chop remaining mango until a thick purée forms; stir into salsa.

    *TORTILLA SPIKES
    Serves 8

    1/4 cup olive oil
    1 teaspoon chili powder
    12 flour tortillas
    1 1/2 teaspoons coarse salt

    1. Heat oven to 350°. Combine oil and chili powder in a small bowl. Brush tortillas with oil mixture, and sprinkle with salt.

    2. Cut tortillas into 1-inch-wide strips, and arrange in a single layer on two baking sheets (you will need to do two batches). Bake until crisp and golden brown, 8 to 10 minutes.

    Source: Martha Stewart Living Omnimedia Inc.


    ~*Halloween can be your time to shine. With a few of these Halloween hints, you'll be the hit of the neighborhood this October. Kids will be talking about your ghastly gruesome goodies for years to come.

    *Halloween Basics
    Armed with a few bottles of food coloring (the gel or paste varieties work best), a good cut-out cookie recipe (try Child-Proof Sugar Cookies,) some cookie cutters, and a few basic frosting recipes (try Royal Icing, Sugar Cookie Frosting or Really Good Frosting) you too will be able to turn your kitchen into a baking cave of horrors.

    *Cookie shapes
    Try bats, cats, witches, ghosts, jack-o-lanterns, pumpkins, leaves, acorns, full moons, broomsticks, cauldrons, martians, spiders, eyeballs, tombstones and any other spooky shape that you can come up with!

    *Cookie colors
    Add gel or paste food coloring to any basic rolled sugar cookie recipe. Orange works great and pumpkin shapes are really easy to do. Add black gel food coloring to your dough for bats and black cats.

    *Colored Frostings
    By mixing different food colorings you can create creepy colors like putrid green, horrible orange, blood red, midnight black, and glow yellow. Top your cookies with some of these colors and watch the screams pour in.

    *Now Go Wild!
    Here are a few ghoulish ideas for spooky Halloween treats.

    *Jack-o-Lantern Pops
    Following the Cookies in a Pot recipe, cut out the dough into pumpkin shapes. Bake, then decorate with icing to resemble a jack-o-lantern.

    *Black Widow Spider Cookies
    Make a batch of Child Proof Sugar Cookies. Add enough black food coloring gel or paste to the dough to get a nice black color (this will take quite a bit). Roll out the dough to 1/8 to 1/4 inch thick and cut into circles, using two different cookie cutters, one smaller and one bigger. Place the cookies on a cookie sheet, attaching the smaller cookie (spider's head) to the larger cookie (spider's body). In the larger circle make a small hourglass-shaped hole and fill it with crushed red hard candy. In the smaller circle make two small holes (for eyes) and fill with yellow or green crushed hard candy. Attach strips of cookie dough to the body for legs.

    *Mounds of Brains Cookies
    Using Butter Cookies II or your favorite refrigerator cookie recipe, add some black food color gel or paste until you get a gray color, then push the dough through a colander to make worm-like shapes. Take small handfuls of the wormy dough and gently shape it into a brain-like shape, then bake. For an added touch, drizzle a little green colored icing over the tops of the baked brains.

    *Glowing Eyes Cookies
    Make a batch of Stained Glass Window Cookies Instead of shaping the cookies to look like windows, make jack-o-lanterns or ghosts with unearthly glowing eyes.

    *Cobweb Pizza Cookie
    Follow the recipe for Cookie pizza omitting the topping ingredients. When cookie is done, drizzle melted chocolate over the top in the shape of a spider web. Sprinkle with insect shaped candies. You can also do this on smaller cookies.

    *Grabbing Fingers
    Use a good cookie press recipe like Classic Butter Cookies. Place the dough in a pastry bag or large plastic bag with one corner snipped off. Pipe the dough into finger-sized amounts onto a parchment paper lined cookie sheet. Then use the dull side of a butter knife to make lines suggesting knuckles, and add an almond or candy for the fingernail. Before baking the finger cookies shape them into a slightly bent shape so that they look like grabbing fingers! Chill cookies before baking. Once baked you can add a bit of red icing if you want a bloody finger. A tasty bowl of these makes for a grisly Halloween treat.


    HALLOWEEN HISTORY

    Halloween was once known as All Hallow's Eve. It was a night of harmless merriment before November 1st, All Saint's Day, a religious observance honoring all saints.

    Jack-o-lanterns were originally associated with men. As early as 1663, "jack" was a common word for "man," and gourds, illuminated by candles, were carried by night watchmen as they made their rounds. Black cats, along with lighter colored cats, were once respected as valuable vermin exterminators. Rats and mice carried diseases and spoiled vast amounts of grain, a vital commodity in earlier centuries.

    The status of cats, however, changed during the 16th century, and this change was greatly influenced by the attitude of Chief Justice Coke of England toward women. Land was another vital commodity, and much of it was occupied by widows. The simplest method of obtaining land was by eliminating these women. This era marked the uprising of the infamous witch hunts, also used to attack and eliminate nonconformists. It was a period of religious wars. Unwilling to relinquish religious and social dominance, English authorities attacked these old women in an attempt to regain control over their subjects.


    Halloween 'Quick Facts'

    1. Halloween traditions go back more than 2,000 years. The ancient Celts - who lived in what is now Ireland, the United Kingdom and France - believed that spirits returned to the earth on October 31st.

    2. To disguise themselves from those spirits, the Celts wore masks after dark on October 31st.

    3. By the seventh century A.D., this Celtic tradition had been combined with All Saint's Day, a day to remember the saints. It was also called All Hallows' Day, and the day before was called All Hallows' Eve. That became known as Halloween.

    4. About 93% of U.S. children go trick-or-treating.

    5. The tradition of trick-or-treating probably started in England around 1000 A.D.. People went door-to-door on All Souls' Day, November 2nd. They would receive 'soul cakes' from families in exchange for a promise to pray for those families' dead relatives.

    6. Many think the Irish popularized trick-or-treating in the United States in the 1840's. In some places, 'treats' were sweet buns, nuts or pennies. A popular 'trick' was tipping over outhouses.

    7. Why do people bob for apples? It may date back to when the Romans conquered the Celts around 43 A.D.. The Romans celebrated a holiday in late October that honored Pomona, the goddess of fruit and trees. Her symbol was an apple.


    More Recipes for Halloween

    from...
    http://www.signonsandiego.com/citysearch/feature/485/recipes.html

    Roasted Pumpkin Seeds


    These Infected Monster Toes are about as gross as Halloween recipes get. Copley News Service photo
    Cut pumpkin open and scoop out seeds and fibrous, stringy tissue. Rinse and remove seeds from strings. (Some say not to rinse the seeds because it removes all the natural flavor.)

    Spread seeds in a single layer on a cookie sheet. Try to make an even layer; the less time they lie on each other, the better they will bake.

    Add salt to taste and bake at 250 degrees until dry, stirring occasionally. Let bake for 15 to 30 minutes or until the seeds start to turn a light gold color.

    Popcorn Balls
    Serves 12

    2 cups popcorn, unpopped
    Salt, to taste
    2-2/3 cups molasses
    1 cup granulated sugar
    1 teaspoon baking soda

    Pop the popcorn and salt lightly. Set aside. In a large, heavy saucepan, cook molasses and sugar until you can spin a thread, or until mixture reaches about 90 degrees on a candy thermometer. Stir constantly. Add soda. The mixture will foam up. Pour mixture over the popcorn, and mix it quickly with a buttered spoon.

    When you are sure it is cool enough to touch, butter your hands and shape into balls while still very warm.

    (From "Pigtails and Frog Legs, A Family Cookbook," Neiman Marcus.)

    Candied Apples
    Serves 10 to 15

    10 to 15 medium apples
    3 cups sugar
    1/4 teaspoon cream of tartar
    2/3 cup water
    1 teaspoon lemon juice
    15 cloves
    1 to 2 teaspoons red food coloring
    Chopped nuts, optional

    Push wooden craft sticks into the stem end of clean apples. Set aside.

    Combine sugar, cream of tartar, water, lemon juice and cloves in heavy saucepan. Stir over heat until sugar dissolves. Add coloring. Boil, without stirring, to hard crack stage, 300 to 310 degrees on a candy thermometer. Remove from heat and skim out cloves. Twist apples in syrup quickly. Place, upside down, on buttered cookie sheet or foil.

    Dust half of each apple opposite skewered end with chopped nuts, if desired.

    (From "Complete Holiday Cookbook" by Favorite Recipes Press.)

    Spicy Witch's Brew

    1 12-ounce can frozen orange juice concentrate
    1/4 cup lemon juice
    2 quarts apple cider
    4 cups water
    1 cup white grape juice
    1-1/2 teaspoons ground cinnamon
    1 package cherry soft drink mix (for ice)
    Large bowl
    Ice trays (approximately three)

    Mix the orange juice, lemon juice, apple cider, water, white grape juice and ground cinnamon together in a large bowl until well blended. Chill for at least an hour in the refrigerator before serving.

    Make a pitcher of cherry soft drink and pour into ice trays. When frozen, add to the witch's brew to look like bloody ice.

    (From "The Big Book of Halloween," by Laura Dover Doran.)

    Ice Cream and Sweets

    Pumpkin Ice Cream
    Makes 1 quart

    1 cup milk
    1/2 cup heavy cream
    1/2 cup Milk Caramel (recipe follows, plus more for serving if desired)
    6 large egg yolks
    1/4 cup sugar
    1/2 teaspoon pure vanilla extract
    2 tablespoons freshly squeezed lemon juice
    1/2 cup cooked Pumpkin Puree (recipe follows)

    Combine milk, cream and Milk Caramel in a saucepan over medium heat. Bring to simmer, stirring frequently as caramel melts.

    Fill a large bowl with ice and water; set aside. Whisk egg yolks and sugar in a bowl until thick and pale, about 4 minutes. While whisking, very slowly add a little hot milk mixture to egg mixture. Add more milk mixture, whisking, until combined. Add vanilla, lemon juice and puree; combine. Strain into a clean bowl; chill in ice bath.

    Freeze in an ice-cream maker according to the manufacturer's instructions. After churning, transfer to freezer until firm. Serve with Milk Caramel, if desired.

    (From Martha Stewart Living.)

    Milk Caramel (for use with Pumpkin Ice Cream recipe)
    Makes about 1 cup

    14-ounce can sweetened condensed milk
    1 small cinnamon stick

    Combine milk and cinnamon stick in top of a double boiler over simmering water. Cook, stirring every 10 to 15 minutes, until milk has reduced by almost half and is thick and amber in color, 1-1/2 to 2 hours.

    Remove from heat; discard cinnamon stick. Beat with a wooden spoon. Transfer to a clean bowl, cover and refrigerate up to several weeks, until ready to use.

    Note: Cook caramel very slowly or it will scorch.

    (From Martha Stewart Living.)

    Pumpkin Puree (for use with Pumpkin Ice Cream recipe)
    Makes 3 cups

    1 3-1/2 pound pumpkin, cut in half

    Preheat oven to 425 degrees. Place pumpkin cut side down on a baking pan, roast until tender, 50-60 minutes. Remove from oven; let cool. Using a large spoon, scrape out and discard seeds. Remove flesh; transfer to the bowl of a food processor. Process until completely pureed without any solid pieces, about 1 minute. Transfer to a bowl. Refrigerate up to several days or freeze up to 1 month.

    (From Martha Stewart Living.)

    Frightening Fingers
    Makes 5 dozen cookies

    1 cup butter (no substitutes), softened
    1 cup confectioners' sugar
    1 egg
    1 teaspoon vanilla extract
    1 teaspoon almond extract
    2 3/4 cups all-purpose flour
    1 teaspoon baking powder
    1 teaspoon salt
    Red decorating gel
    1/2 cup sliced almonds

    In a mixing bowl, cream butter and sugar. Beat in the egg and extracts. Combine the flour, baking powder and salt; gradually add to the creamed mixture. Divide dough into fourths. Cover and refrigerate for 30 minutes or until easy to handle.

    Working with one piece of dough at a time, roll into 1-in. balls. Shape balls into 3-in. x 1/2-in. fingers. Using the flat tip of a table knife, make an indentation on one end of each for fingernail. With a knife, make three slashes in the middle of each finger for knuckle.

    Place 2 in. apart on lightly greased baking sheets. Bake at 325 degrees F for 20-25 minutes or until lightly browned. Cool for 3 minutes.

    Squeeze a small amount of red gel on nail bed; press a sliced almond over gel for nail, allowing gel to ooze around nail. Remove to wire racks to cool.

    (This recipe from Taste of Home magazine.)

    Variation: For Infected Monster Toes, mold dough into toe shapes and substitute a smashed green Fruit Gusher candy for the red gel and sliced almond. (From Jennifer Mastroianni, Copley News Service.)

    Scary Spiders
    Makes 40 spiders

    1/2 cup softened butter
    1/2 cup light corn syrup
    1/2 teaspoon vanilla extract
    2 cups California raisins
    1/2 cup finely chopped walnuts
    4 cups (1 pound) powdered sugar
    Powdered sugar, chopped nuts and/or chocolate sprinkles
    Licorice laces or whips
    Small candies

    In large bowl, beat butter, corn syrup, salt and vanilla extract together until creamy. Mix in raisins and nuts. Sift in powdered sugar 1 cup at a time until mixture thickens. Turn onto board and sprinkle with powdered sugar and use hands to form dough. Shape into 1-inch balls. Roll in powdered sugar, finely chopped walnuts or chocolate sprinkles. Cut licorice whips into 2-inch lengths and shape into legs. Arrange four legs on two sides of each ball. Place on wax paper-lined tray. Top with small candies for eyes. Chill until firm.

    (From Saimi Rote Bergmann, Copley News Service.)

    Yummy Mummy Cookies
    Makes about 30 cookies

    2/3 cup butter or margarine, softened
    1 cup sugar
    2 teaspoons vanilla extract
    2 eggs
    2 1/2 cups all-purpose flour
    1/2 cup cocoa
    1/4 teaspoon baking soda
    1/2 teaspoon salt
    1 to 2 packages (10 ounces each) white chocolate chips
    1 to 2 tablespoons shortening (do not use butter, margarine or oil)
    Miniature semisweet chocolate chips, for garnish

    Beat butter, sugar and vanilla in a large bowl until creamy. Add eggs; beat well.

    Stir together flour, cocoa, baking soda and salt; gradually add to butter mixture, beating until blended. Refrigerate dough 15 to 20 minutes or until firm enough to handle.

    Heat oven to 350 degrees. To form mummy bodies, using 1 tablespoon dough, roll into 3 1/2-inch-long carrot shape; place on an ungreased cookie sheet. To form the mummy's head, roll 1 teaspoon dough into a ball the size and shape of a grape, press onto the wide end of the body. Repeat procedure with remaining dough.

    Bake 8 to 9 minutes, or until set. Cool slightly; remove from cookie sheet to wire rack. Cool completely.

    Place 1 2/3 cups (a 10-ounce package) white chips and 1 tablespoon shortening in microwave-safe pie plate or shallow bowl. Cook on high (100 percent power) for 1 minute; stir until chips are melted.

    Coat tops of cookies by placing one cookie at a time on table, knife or narrow metal spatula; spoon white chip mixture over cookie to coat. (If mixture thickens, return to microwave for a few seconds.)

    Place coated cookies on wax paper. Melt additional chips with shortening, if needed, for additional coating. As coating begins to set on cookies, using a toothpick, score lines and facial features into coating to resemble mummy. Place 2 small semisweet chocolate chips on each cookie for eyes. Store covered in cool, dry place.

    (This recipe from Hershey's Cocoa.)

    Frozen Witches
    Serves 8

    Tube of chocolate decorating gel
    8 chocolate sugar cones
    8 thin, round chocolate wafers
    1 pint pistachio ice cream
    Black shoestring licorice
    Chocolate chips
    Candy corn

    For each dessert, squeeze a ring of decorating gel around the edge of the cone and attach the cone to a chocolate wafer "rim," then set it aside.

    Using an ice-cream scoop, drop individual "heads" of ice cream onto a cookie sheet lined with waxed paper.

    Cut pieces of licorice to make hair and a mouth and arrange them in place on the ice-cream face. Add chocolate-chip eyes and a candy-corn nose. Top each scoop with a cone hat (flatten the ice cream slightly so the hat doesn't fall off.) Freeze for at least two hours, or until the hats are set in place.

    Note: To avoid meltdown, make these desserts in batches of four.

    (This recipe from Family Fun magazine.)


    For Kids

    Witch's Wagons

    Cut celery into 2-inch pieces. Spread with peanut butter and dot with candy corn or gummi creatures. For wheels, slice carrots into thin coins and secure with toothpicks to celery. This is a healthy snack, plus kids love it.

    Baby Jack

    Draw jack-o'-lantern faces on oranges, then cut off top part and scoop out pulp. Pour in orange Jell-O that's not quite set. Add red cinnamon candies, candy corn and/or chocolate chips. Chill till set. (Put the oranges in muffin tins to keep them steady while they chill.)

    Graveyard Pudding

    Fill clear plastic cups with chocolate pudding. Crumble chocolate cookies on top to look like dirt. Stick Chiclets in to look like gravestones. Add sugar skeletons and tiny candy pumpkins.

    An Apple a Day

    Start with caramel apples made from kits. Let kids create their own monsters by adding marshmallow eyes, for instance, or licorice legs and arms. (If needed, use bits of icing or syrup to make the stuff stick to the apple.)

    Frozen Floating Hands

    2 cups hot water
    1/2 cup honey
    1-2 tablespoons lemon juice
    Red food coloring
    Plastic gloves

    Blend water and honey and lemon juice in bowl. Pour into clean rubber glove. Drop in a few drops of red food coloring for a marbled or blood vein look. Freeze completely.

    To serve, peel off glove -- carefully -- and add to punch bowl.

    (From Saimi Rote Bergmann, Copley News Service.)


    For Grown-ups

    Great Glogg

    1 gallon dry red wine
    2 cinnamon sticks
    4 to 5 cloves
    Peel of 1 orange, cut into strips
    1 kiwi fruit, peeled and thinly sliced
    1 cup raisins
    1 cup dry roasted, unsalted mixed nuts (no peanuts)
    1 (750 ml) bottle fruity young red wine
    1 pint brandy
    Sugar
    Additional nuts and raisins

    Combine 3 cups dry red wine, cinnamon sticks, cloves, orange peel, kiwi, raisins and nuts in medium saucepan. Cover and simmer over very low heat for 3 to 5 minutes. Do not allow mixture to boil. Remove from heat and let stand at room temperature 45 minutes to steep.

    Strain into large stockpot. Add remaining red wine. Cover and cook over low heat until heated through. Do not boil. Stir in brandy. Stir in sugar to taste. Remove from heat and serve warm with nuts and raisins in mug.

    (This recipe from Susan Janowski, Austin, Texas.)

    Bloody Eyeball Martinis
    Serves 1

    Eyeball:
    1 radish
    1 pimiento stuffed green olive

    Drink:
    1 shot gin or vodka
    1/4 shot dry vermouth (more or less to taste)

    Prepare ice "eyeballs" at least a day before your plan to use them. Peel radishes, leaving thin streaks of red skin to represent blood vessels. Using the tip of the vegetable peeler or a small knife, carefully scoop out a small hole in each radish, roughly the size of an olive. Stuff a green olive, pimiento side out, in each hole. Place 1 radish eyeball in each section of an empty ice cube tray. Pare the radishes down a bit to fit, if necessarry. Fill the tray with water and freeze overnight.

    To make drink, shake liquor in cocktail shaker and pour over two to three eyeball ice cubes in a martini glass. Or add liquor and three to four ice cubes to tall cocktail glass and stir.

    (From http://www.fabulousfoods.com.)

    Pumpkin Recipes

    Pumpkin Butter

    1/4 cup canned pumpkin
    1/4 teaspoon nutmeg
    1/8 teaspoon allspice
    1/2 teaspoon cinnamon
    1/2 unsalted butter

    Heat canned pumpkin in a small saucepan over medium heat, stirring constantly until it dries out (about 2 minutes). Let cool; then, by hand or with an electric mixer fitted with the paddle attachment, fold puree, nutmeg, allspice and cinnamon into room-temperature unsalted butter. Refrigerate up to two weeks.

    (From Martha Stewart Living.)

    Pumpkin Fritters
    Serves 4

    1 cup grated raw pumpkin
    1 large egg
    1 cup flour
    1/2 cup sugar
    1 teaspoon vanilla
    Dash of salt
    1/4 cup raisins (optional)
    Vegetable oil for deep frying
    Brown sugar (optional)

    In a large bowl, combine pumpkin, egg, flour, sugar, vanilla and salt. Blend in the raisins (if using). Form the batter into approximately 20 loosely packed 1- to 1-1/4-inch balls.

    In a large skillet, heat 1 inch of oil to 350 to 375 degrees. Drop the fritters into the oil, being careful not to crowd, and brown well on all sides. Drain the fritters on paper towels and, if desired, sprinkle with brown sugar.

    (From "Jazz Cooks: Portraits and Recipes of the Greats.")

    Smoky Pumpkin Soup
    Serves 6

    6 slices bacon, fat reserved after cooking
    4 tablespoons (1/2 stick) unsalted butter
    6 cups peeled cut-up pumpkin (1-inch pieces)
    6 cups beef stock
    1/2 cup Marsala wine
    1 teaspoon dried thyme
    Salt and freshly ground black pepper, to taste

    Cook bacon until crisp, remove bacon and dice when cool. Pour reserved bacon fat into stockpot and heat, along with butter, on medium-high heat. Add pumpkin and saute for 15 minutes, stirring occasionally. Pour in the stock and simmer, covered, until the pumpkin is very tender, about 30 minutes. Remove from heat.

    Add Marsala, thyme, salt and pepper to taste. Process the soup in batches in a blender until smooth. Return to the stockpot. Add the bacon. Simmer 10 minutes. Serve immediately.

    (From "The Silver Palate Good Times Cookbook.")


    Snack Attack

    from...

    http://www.calgarysun.com/cgi-bin/publish.cgi?p=64906&x=articles&s=lifestyle


    Scary snacks
    Lorena D. Johnson
    Calgary Sun

    October 27, 2002

    Halloween doesn’t have to be just child’s play. Adults can get into the spooky spirit too by hosting a party of their own to celebrate the holiday.


    EYEBALL HIGHBALLS

    Keep it simple with a few recipes designed around the autumn season. Or go all out with scary starters, eerie entrees and devilish desserts — this is a great opportunity to show off your culinary skills.

    The party can be as wild as your imagination with foods designed to shock and wow your guests — whatever your heart desires.

    Here are a few ideas from some culinary professionals on how to get the job done Halloween-style:

    DEEP FRIED ANTS

    “Deep fried ants” will have your guests running scared. Simply deep-fry shredded coconut and serve to guests to munch on,” suggests Fritz Sonnenschmidt, national chairman of the American Academy of Chefs.

    • • • • •

    DEVILISH POPCORN

    For a devilishly hot popcorn treat, blend popcorn with red caramel, spicy Cajun seasoning, Tabasco, salt, dried orange peel, red and black licorice bits and top off with butter,” suggests Cory Schreiber, chef-owner of Wildwood Restaurant and Bar, Portland, Ore.

    • • • • •

    GRAVE MATTER

    While this one sounds like a great one for the kids to enjoy, it would also make a great centrepiece for an adult party.

    “For an edible tombstone centrepiece to die for, grind chocolate wafer cookies in the food processor until crumbs form,” said Susan Goss, chef and co-owner of West Town Tavern, Chicago.

    Mound the crumbs on a tray. On the ends of rectangular shortbread cookies, spread marshmallow fluff and press through the cookie “dirt,” to attach to the tray.

    Complete the creepy graveyard look by scattering gummy worms and spiders.

    • • • • •

    MARTHA'S HALLOWEEN

    Martha Stewart recommends adults take some time out for themselves on Halloween as well in her book, Halloween, The Best of Martha Stewart (Clarkson Potter/Publishers).

    Each year, one family can host the end-of-the-night party — the last trick or treat stop — featuring some speciality items for the weary parents. Consider Eyeball Highballs to wash down Tortilla Spikes with The Devil’s Salsa.

    Whatever theme your Halloween party takes, it’s sure to be a night for the adults to remember.

    — with files from AP
    • • • • •

    TORTILLA SPIKES

    You will need to make these in two batches. Serves eight.

    1/4 cup olive oil
    1 tsp. chili powder
    12 flour tortillas
    11/2 tsp. coarse salt

    1. Preheat oven to 350 F. Combine the oil and chili powder in a small bowl. Brush each tortilla with the oil mixture and sprinkle with salt.
    2. Cut into 1-in.-wide strips, and arrange in a single layer on two baking sheets.
    3. Bake until crisp and golden brown, eight to 10 minutes.

    • • • • •

    THE DEVIL’S SALSA

    2 ears corn kernels
    3 Tbsp. olive oil
    1 orange bell pepper
    1 15-oz. can black beans, rinsed, drained
    1 mango, peeled, pitted and diced
    1 hot red pepper, seeds and ribs removed, finely diced
    1/2 red onion, finely diced
    Juice of 2 limes (about 5 Tbsp.)
    1 tsp. coarse salt

    1. Preheat oven to 450 F. Place corn on a baking sheet brushed with 1 tsp. olive oil; roast until kernels begin to brown. Set aside to cool.
    2. Place pepper on gas burner; roast until charred on all sides. Transfer to bowl; cover with plastic wrap. When cool, peel off charred skin with your fingers, and remove stem and seeds. Chop into 1/4-in. dice; place in large bowl.
    3. Add corn, beans, half of the diced mango, hot red pepper, onion, lime juice, remaining oil and salt; toss to combine. Chop remaining mango until a thick puree forms; stir into salsa.

    — Halloween, The Best of Martha Stewart Living (Clarkson Potter/Publishers)

    • • • • •

    SMILIN’ JACK SANDWITCH

    This would be a delight for both the young and old.
    Makes one large portion or two smaller serving.

    2 or 3 ready-made frozen bread-dough rolls
    1 beaten egg

    1. Thaw rolls and press together to form a flat oval “pumpkin” shape. With a knife, cut a shallow, wide V-shape in the side of the oval. Rotate the V about a quarter-turn and tuck the point under the “pumpkin” to form the stem.2. Place on a cookie sheet coated with nonstick cooking spray. Cut out three large triangles for eyes and a nose, and a large crescent shape for a mouth. Leave some teeth in, if desired.
    3. Cut three curved lines from top to bottom, almost but not all the way through the dough. Brush with egg and allow to rise for 30 minutes.
    4. Bake at 350 F for about 20 minutes or until golden brown. Let cool on rack, then slice horizontally.
    5. Fill with piping hot barbecue beef and cheese, or your own favourite sandwich makings.

    — Rhodes Bake-N-Serve

    • • • • •

    EYEBALL HIGHBALLS

    Watch the reaction of your guests as they down this drink. Serves four.

    14 small radishes
    7 pimiento-stuffed olives, halved crosswise
    16 oz. gin or vodka
    1 oz. vermouth

    1. Trim stem and root ends of each radish. Using a paring knife, scrape red skin from radish, leaving just enough to give veiny appearance.With a small melon baller, cut a hole in the radish, about 1/2-in. in diameter. Fit an olive half, cut side out into the hole. Place radish in ice-cube tray. Repeat with remaining radishes. Fill tray with water and freeze.
    2. Mix gin or vodka with vermouth; stir with ice. Divide eyeball ice cubes among four glasses. Strain martini; pour into glasses and serve.

    — Halloween, The Best of Martha Stewart Living (Clarkson Potter/Publishers)

    • • • • •

    THE GREAT PUMPKIN CAKE

    You’ll need two eight-inch bundt pans. To make a stem, twist a brown paper lunch bag into a stem shape and wrap it tightly with green floral tape. Insert stem into the centre of the cake. Serves 16.

    1 Tbsp. unsalted butter, plus more for pans
    3/4 cup Dutch-process cocoa powder, sifted, plus more for pans
    2 cups sugar
    2 cups all-purpose flour
    2 tsp. baking soda
    1 tsp. baking powder
    1/2 tsp. coarse salt
    2 large eggs
    2 tsp. pure vanilla extract
    1/2 cup canola oil
    3/4 cup nonfat buttermilk
    3/4 cup milk
    3 oz. hazelnut or milk chocolate
    3 oz. bittersweet chocolate
    7 oz. heavy cream
    Orange Butter Glaze
    Chocolate Leaves for garnish

    1. Preheat oven to 350 F. Generously butter the inside of two 8-in. bundt pans; dust lightly with cocoa powder.
    2. Combine sugar, flour, cocoa, baking soda, baking powder and salt in the bowl of an electric mixer; set aside.
    3. In a medium bowl, whisk together the eggs, vanilla, canola oil, buttermilk and milk. Slowly add egg mixture to sugar mixture. Mix the batter with a paddle on low speed until smooth, about one minute. Divide batter evenly between the prepared pans. Bake cakes until cake tester inserted into centre comes out clean, about 40 minutes. Transfer to a cooling rack and cool for 20 minutes before removing.
    4. Place both chocolates, heavy cream and remaining tablespoon of butter in a medium heat-proof bowl or the top of a double boiler, over a pan of gently simmering water. Heat, stirring often, until chocolate is completely melted, about five minutes. Remove from heat, and let cool to room temperature. Whisk chocolate until lightened; set aside.
    5. Using a serrated knife, trim the bottoms of both cakes so they are both flat. Spread the chocolate evenly on the flat side of one of the cakes. Invert the remaining cake onto the chocolate to form a pumpkin shape.
    6. Working quickly, pour orange butter glaze over the cake, tilting the cake as necessary to coat all sides. Let the glaze set completely before garnishing with chocolate leaves.

    • • • • •

    ORANGE BUTTER GLAZE

    5 Tbsp. milk
    A few drops of orange liquid paste food colouring
    4 cups sifted confectioners’ sugar
    1 cup unsalted butter, melted

    1. In a small bowl, combine the milk and the orange food colouring until the mixture reaches the desired colour and set aside.
    2. In a medium bowl, whisk together the sugar and melted butter. Add the milk mixture, and continue whisking until smooth. Use immediately.

    • • • • •

    CHOCOLATE LEAVES

    20 ivy or rose leaves, about 21/2-in. long
    4 oz. hazelnut or milk chocolate, chopped

    1. Wash the leaves, and dry thoroughly. Set aside on a rimmed baking sheet lined with parchment paper. Place chocolate in a medium heat-proof bowl, or the top of a double boiler, over a pan of simmering water. Stir occasionally until chocolate is melted. Remove from heat.
    2. Using a soft 1/4-in. pastry brush, coat the underside of each leaf with a thin layer of chocolate. Place leaves in the refrigerator until firm.
    3. Brush the leaves with a second layer of chocolate, and chill again. When firm, carefully peel the leaf from the chocolate. Set chocolate leaves on baking sheet, and store in the refrigerator until ready to use. Use within one day.

    — Halloween, The Best of Martha Stewart Living (Clarkson Potter/Publishers)


    Bat Pinata

    from...
    http://www.marthastewart.com/page.jhtml?type=content&id=channel190846&page=5&edfParentCat=&subStyleType=&layout=&catid=&navLevel=&site=&dp=false


    Bat Piñata
    This bat piñata is creepy enough to be the center of your decorations. Just be careful after dark; he might swoop down and give you a fright.
    You will also need: newspaper, string, candy, white card stock, black poster board.

    Cover one large and one small balloon with four layers of newspaper, then with black tissue. (Note: When making body from large balloon, stop after two layers of newspaper and tie a long piece of string around center; continue with newspaper and tissue.) Let dry. Cut a hole in top of body with utility knife (save piece to use for ears); remove balloon. Cover cut edge with tissue. Fill body with candy.


    Assembling Bat
    Pop and remove the balloon from smaller piece. Place small sphere (the head) onto large one (the body). Drape several layers of tissue paper over the head toward the body and around the neck, brushing with diluted glue until neck is secure. Let dry.
    Draw or download and print face template; trace onto white card stock. Cut out features; attach with undiluted glue. Cut ears from reserved piece; glue in place.


    Making Wings
    Sketch large wing shapes on black poster board, and cut them out. Secure wings to the sides of the bat’s body with black duct tape. Paste black tissue paper over the joints to cover the tape. Next, use tape to attach a length of string to the end of each wing. (This will allow you to suspend the wings as if in flight.) Cover the tape with tissue paper. To hang the bat, suspend from body string. Then, tack the two wing strings to the ceiling to make the bat look as if it is flying.


    PRINTABLE FILES
    We offer the downloadable file in a portable document format, or PDF, in order to make the details clear and printable. To view and print the file, you need a program called Adobe Acrobat Reader, which most browsers already include. If you have trouble downloading the file, or if you’d like an upgrade, you can obtain the software for free from Adobe’s website.


    Candy Dispenser

    from....
    http://www.marthastewart.com/page.jhtml?type=content&id=channel190846&page=4&edfParentCat=&subStyleType=&layout=&catid=&navLevel=&site=&dp=false


    Candy Dispenser

    This hissing papier-mâché cat has a mouthful of treats.
    You will also need: newspaper, white pencil, black duct tape, white and black card stock, treats.

    Cover balloon with two layers of red tissue paper, two of newspaper, then with black tissue. Let dry. With utility knife and scissors, cut out a mouth-shaped wedge (sketch with white pencil first); set aside. Secure with duct tape across inside of upper lip. Cover tape with black tissue. Cut ears from wedge, and affix with duct tape; cover with tissue. Download and print face template; trace onto card stock. Cut out features; attach with undiluted craft glue. Roll black tissue into whiskers; glue in place. Fill mouth with treats.
    Cat-Bucket Variation: Make head without cutting out mouth; cut a hole on top. Place ears on either side. Poke a hole 1/2 inch in from edge on each side of rim; thread with black wire and twist ends for handle.


    PRINTABLE FILES
    We offer the downloadable file in a portable document format, or PDF, in order to make the details clear and printable. To view and print the file, you need a program called Adobe Acrobat Reader, which most browsers already include. If you have trouble downloading the file, or if you’d like an upgrade, you can obtain the software for free from Adobe’s website.


    Jack o' Lanterns to make

    from....
    http://www.marthastewart.com/page.jhtml?type=content&id=channel190846&page=3&edfParentCat=&subStyleType=&layout=&catid=&navLevel=&site=&dp=false


    Lantern

    Jack-o’-lanterns set an eerie party mood. These papier-mâché versions started out as balloons. Strips of tissue paper and glue give the grinning faces structure. Make them with stems or without, and illuminate with battery-powered lights.
    You will also need: floral wire, floral tape, cotton balls.

    Cover a balloon with two layers of orange tissue paper, then two of yellow. Once dry, cut a lid from knot end, and a small circle from other end for a base. Cut out features with utility knife and scissors; cover inside with tissue (glue at edges). For stem, push three lengths of floral wire through knot hole in lid. Attach a cotton ball to underside with floral tape. Wrap each wire in floral tape; twist together at bottom to create stem’s base; wrap end of each wire around a pencil to make tendrils.


    Treat Balls

    from...

    http://www.marthastewart.com/page.jhtml?type=content&id=channel190846&page=2&edfParentCat=&subStyleType=&layout=&catid=&navLevel=&site=&dp=false


    Treat Balls

    Treat balls adorned with silhouettes are spooky party favors.
    You will also need: treats.

    Cover small balloons with one layer of orange tissue paper and then one layer of yellow. Cut out your own shapes, or download and print our silhouettes, then trace them onto black tissue paper; cut out each shape. Affix the silhouettes to spheres with diluted glue. When dry, enlarge knot holes (start cutting with utility knife, then finish with scissors). For party favors, fill balls with candy and tiny toys; paste a circle of orange tissue paper over the hole.


    PRINTABLE FILES
    We offer the downloadable file in a portable document format, or PDF, in order to make the details clear and printable. To view and print the file, you need a program called Adobe Acrobat Reader, which most browsers already include. If you have trouble downloading the file, or if you’d like an upgrade, you can obtain the software for free from Adobe’s website.


    Paper Caper

    from...


    Paper Caper
    The simplest supplies can make the party. The shivery, candy-fueled thrill of trick-or-treating lasts but an hour or two. Why not prolong the fun by inviting kids to a party? Little goblins can work together with grown-ups to make decorations, including papier-mâché pumpkins and decoupage lanterns. These easy crepe- and tissue-paper techniques can also be used to make spherical treat containers and even a piñata shaped like a wing-flapping bat. None of the projects here requires anything more than basic craft supplies. Set aside some time on an early-fall afternoon to create all, or just one, of the haunting ornaments. For a really special event, you can sew costumes with paper streamers and crepe paper. Soon your house will be transformed into the perfect venue for a monster celebration.
    Papier-Mâché Basics
    Almost all the projects on these pages—from tiny treat containers to a giant bat piñata—begin with these two steps: Pasting layers of tissue paper onto balloons that serve as forms, and then letting them dry, hardening so they can be cut and embellished. The balloons vary in size from the large birthday-party variety to small ones sometimes sold as water balloons. A list of what you’ll need to get started is below; additional necessary items are included with each project. Templates for treat-ball silhouettes and cat and bat faces can be downloaded and printed. When using black tissue paper, wear gloves and cover your work surface because the dye may run and stain.


    Tools and Materials
    • balloons
    • jars
    • craft glue
    • colored tissue paper
    • medium artist’s paintbrush
    • clothespins and clothesline
    • small scissors
    • pencil
    • utility knife
    Pasting
    Begin by resting a balloon on an empty jar (this will prevent the damp tissue from discoloring or sticking to the work surface). Dab diluted craft glue (2 parts glue to 1 part water) on a small section of the balloon, and drape a strip of tissue paper from the balloon’s crown to its knot. Using a paintbrush, apply more glue over the strip. Add another strip so it slightly overlaps the first, and brush on more glue. Continue around the balloon, layering tissue as desired (see individual project instructions for details) and leaving the knot exposed.
    Drying
    Using clothespins, hang the tissue-covered balloons from the clothesline by their knots; let dry completely (several hours or overnight). Pop each balloon by making a slit with scissors next to the knot. Remove balloon through hole around knot.


    Paper Mache Basics

    from...
    http://www.marthastewart.com/page.jhtml?type=content&id=channel190846&page=1&edfParentCat=&subStyleType=&layout=&catid=&navLevel=&site=&dp=false


    Paper Caper

    The simplest supplies can make the party. The shivery, candy-fueled thrill of trick-or-treating lasts but an hour or two. Why not prolong the fun by inviting kids to a party? Little goblins can work together with grown-ups to make decorations, including papier-mâché pumpkins and decoupage lanterns. These easy crepe- and tissue-paper techniques can also be used to make spherical treat containers and even a piñata shaped like a wing-flapping bat. None of the projects here requires anything more than basic craft supplies. Set aside some time on an early-fall afternoon to create all, or just one, of the haunting ornaments. For a really special event, you can sew costumes with paper streamers and crepe paper. Soon your house will be transformed into the perfect venue for a monster celebration.
    Papier-Mâché Basics
    Almost all the projects on these pages—from tiny treat containers to a giant bat piñata—begin with these two steps: Pasting layers of tissue paper onto balloons that serve as forms, and then letting them dry, hardening so they can be cut and embellished. The balloons vary in size from the large birthday-party variety to small ones sometimes sold as water balloons. A list of what you’ll need to get started is below; additional necessary items are included with each project. Templates for treat-ball silhouettes and cat and bat faces can be downloaded and printed. When using black tissue paper, wear gloves and cover your work surface because the dye may run and stain.


    Tools and Materials
    • balloons
    • jars
    • craft glue
    • colored tissue paper
    • medium artist’s paintbrush
    • clothespins and clothesline
    • small scissors
    • pencil
    • utility knife
    Pasting
    Begin by resting a balloon on an empty jar (this will prevent the damp tissue from discoloring or sticking to the work surface). Dab diluted craft glue (2 parts glue to 1 part water) on a small section of the balloon, and drape a strip of tissue paper from the balloon’s crown to its knot. Using a paintbrush, apply more glue over the strip. Add another strip so it slightly overlaps the first, and brush on more glue. Continue around the balloon, layering tissue as desired (see individual project instructions for details) and leaving the knot exposed.
    Drying
    Using clothespins, hang the tissue-covered balloons from the clothesline by their knots; let dry completely (several hours or overnight). Pop each balloon by making a slit with scissors next to the knot. Remove balloon through hole around knot.


    Peekaboo

    from...
    http://www.marthastewart.com/page.jhtml?type=content&id=channel190845&page=8&edfParentCat=&subStyleType=&layout=&catid=&navLevel=&site=&dp=false

    peek

    Peekaboo
    Being trapped in a candy dish is vexing, to be sure. The mini pumpkin at right had his stem sliced off, then was placed in the bowl. His eyes and nose were penciled in; he was removed, carved, and cruelly confined again. The one at left was carved, then balanced on a teapot.


    Morbid Multiples

    from...

    morbid

    Morbid Multiples
    Not one but five apple gourds, which have an unpleasantly mottled hue, lie in wait on this sill. Their shifty glances and tormented frowns were carved to look similar—yet not quite the same. A bed of dead branches ensures this vengeful band will get no sleep.


    Dead Head Pumpkins

    from...
    http://www.marthastewart.com/page.jhtml?type=content&id=channel190845&page=6&edfParentCat=&subStyleType=&layout=&catid=&navLevel=&site=&dp=false

    dead heads

    Dead Heads
    Don’t be shy: Show off your top-notch collection of bodiless heads by placing them atop pedestals. You can put the display next to a stair railing or adjacent to a walkway outdoors—in fact, anywhere you think a leering head would be a nice decorative touch.


    Welcoming Committee

    from....http://www.marthastewart.com/page.jhtml?type=content&id=channel190845&page=3&edfParentCat=&subStyleType=&layout=&catid=&navLevel=&site=&dp=false


    welcoming

    Welcoming Committee
    These greeters are trying to smile, but their true feelings are revealed in their maniacal grins and grimaces. Perhaps they’re angry because someone took out their insides to make pie. Not to worry: They can’t eat you, at least not before sunset.


    Birdbath Family

    From... http://www.marthastewart.com/page.jhtml?type=content&id=channel190845&page=2

    birdbath

    Birdbath Family
    Behold, the count and countess of Birdbath, and their three little countlings. They redid this abandoned two-story bath, carpeting it with Spanish moss, dead leaves, and branches. The gourds were carved from the bottom, like most other heads shown in our slide show, to keep stems intact.


    About Face Pumpkin

    from...

    table

    About Face
    These pumpkin heads are from the wrong side of the patch: Other gourds greet the world with toothy smiles and innocent triangle-shaped eyes, but this frightful bunch does its best to make passersby wish they had stayed home baking pie. If, however, you’re the sort of person who likes to keep strange company, you’ll be pleased how easy it is to create these gawking heads. Draw faces you like, or print our templates to make the ones shown here. Then carve the pumpkins as you would for normal, well-adjusted gourds. If neighbors talk, just lean out the window, bare your teeth, and waggle your eyebrows in an alarming manner.
    Table Of Trouble

    Even though they’re always disdainfully wrinkling their noses at you, this nosy family are smart to have around: They can smell danger from miles away. When carving, hollow them out from a hole in the bottom, and position their features on top so the stems can serve as noses.
    Click through the following pages to see the whole gourd horde.

    Face It (It's Easy)

    You can use the general directions for all these projects, except the narrow butternut squash (separate directions follow).
    You will need:
    • a keyhole saw or serrated knife
    • plaster scraper or large spoon
    • black marker and white paper or our template
    • masking tape
    • needle tool (from an art-supply store) or awl
    • serrated utility knife
    • miniature flashlights, battery-powered candles, or light sticks
    • an apple corer
    How to Make the Faces
    Begin by cutting a large hole in the bottom of a pumpkin with a keyhole saw or serrated knife, and then scrape out the insides with a plaster scraper until pumpkin walls are 1/2 to 3/4 inch thick. To make the face, you can draw your own using black marker on white paper, or download and print our templates; enlarge the template to the desired size on a photocopier. Next, affix the face to the pumpkin with masking tape.
    ht1


    With a needle tool or awl, poke holes around the outline of each feature. Remove the paper, and then cut out features with a serrated utility knife, using the holes you poked as a guide. To illuminate the carved pumpkins, use miniature flashlights, battery-powered candles, or light sticks.
    ht2


    Carving a Squash
    To hollow out a tall, skinny squash, scoop out the insides from the top and the bottom: Cut off the bottom with a keyhole saw, and use a plaster scraper to scoop out the wide bottom section until walls are 1/2 to 3/4 inch thick. Then cut off the top with the keyhole saw, and use an apple corer to remove the insides at that end. Carve features as you would for the other pumpkins; replace the top for display, if desired.
    ht3


    About Face Pumpkin

    from...


    table

    About Face
    These pumpkin heads are from the wrong side of the patch: Other gourds greet the world with toothy smiles and innocent triangle-shaped eyes, but this frightful bunch does its best to make passersby wish they had stayed home baking pie. If, however, you’re the sort of person who likes to keep strange company, you’ll be pleased how easy it is to create these gawking heads. Draw faces you like, or print our templates to make the ones shown here. Then carve the pumpkins as you would for normal, well-adjusted gourds. If neighbors talk, just lean out the window, bare your teeth, and waggle your eyebrows in an alarming manner.
    Table Of Trouble

    Even though they’re always disdainfully wrinkling their noses at you, this nosy family are smart to have around: They can smell danger from miles away. When carving, hollow them out from a hole in the bottom, and position their features on top so the stems can serve as noses.
    Click through the following pages to see the whole gourd horde. > > >
    Face It (It's Easy)

    You can use the general directions for all these projects, except the narrow butternut squash (separate directions follow).
    You will need:
    • a keyhole saw or serrated knife
    • plaster scraper or large spoon
    • black marker and white paper or our template
    • masking tape
    • needle tool (from an art-supply store) or awl
    • serrated utility knife
    • miniature flashlights, battery-powered candles, or light sticks
    • an apple corer
    How to Make the Faces
    Begin by cutting a large hole in the bottom of a pumpkin with a keyhole saw or serrated knife, and then scrape out the insides with a plaster scraper until pumpkin walls are 1/2 to 3/4 inch thick. To make the face, you can draw your own using black marker on white paper, or download and print our templates; enlarge the template to the desired size on a photocopier. Next, affix the face to the pumpkin with masking tape.
    ht1


    With a needle tool or awl, poke holes around the outline of each feature. Remove the paper, and then cut out features with a serrated utility knife, using the holes you poked as a guide. To illuminate the carved pumpkins, use miniature flashlights, battery-powered candles, or light sticks.
    ht2


    Carving a Squash
    To hollow out a tall, skinny squash, scoop out the insides from the top and the bottom: Cut off the bottom with a keyhole saw, and use a plaster scraper to scoop out the wide bottom section until walls are 1/2 to 3/4 inch thick. Then cut off the top with the keyhole saw, and use an apple corer to remove the insides at that end. Carve features as you would for the other pumpkins; replace the top for display, if desired.
    ht3


    Swamp Cider Idea

    from... http://www.marthastewart.com/page.jhtml?type=content&id=channel190843&page=4&edfParentCat=&subStyleType=&layout=&catid=&navLevel=&site=&dp=false


    Bottle Labels
    Triple the terror with these labels that urge guests to indulge—if they dare.
    Download and print labels. Use craft glue to attach labels to plain room-temperature bottles or carafes (you can soak wine bottles to remove their original labels). Allow two days to set. Or print labels on adhesive-backed paper using an ink-jet printer, then press onto bottles.


    Small Paper Pumpkin Lanterns

    from...
    http://www.marthastewart.com/page.jhtml?type=content&id=channel190843&page=3&edfParentCat=&subStyleType=&layout=&catid=&navLevel=&site=&dp=false


    Pumpkin Lanterns
    Playful pumpkins open their mouths to let candlelight stream through.
    Download and print lantern; then glue black paper onto the back and cut out. Use a utility knife to cut out eyes, noses, and mouths, and craft glue to affix orange tissue paper or vellum behind the cutouts.
    Fold lantern on dotted lines, and secure tab with glue to close. Place over a votive candle in a glass holder.


    Noisemakers and Place Cards

    from...


    Noisemakers & Place Cards
    These witches and bats cause double trouble—as noisemakers and place cards.
    Download and print rounds. Glue black paper to the backs for sturdiness, and cut out the rounds. For noisemakers, cut mouth slit with a utility knife. Snip stem off an orange balloon, and stick the cut end through the slit from the back. Attach round to wooden craft stick with craft glue. Blow through balloon opening for a supernatural sound. For place cards, fill in slit with a black marker. Write a guest’s name in iridescent pen on the black border of each round, and set on dinner plates.
    PRINTABLE FILES
    We offer the downloadable files in a portable document format, or PDF, in order to make the details clear and printable. To view and print the file, you need a program called Adobe Acrobat Reader, which most browsers already include. If you have trouble downloading the file, or if you’d like an upgrade, you can obtain the software for free from Adobe’s website.


    Spirited Paper Candy Dishes

    from

    dish

    Spirited Table
    Put away that book of spells. At Halloween, you need little more than paper, glue, and our original art to set a spirited table. The spookiest holiday of the year calls for entertaining in a frightful fashion. Whether you’re hosting a blowout party or just want to give dinner some demonic flair, our easy-to-assemble decorations will fit right in. We created the artwork, and give you some templates (to download them, follow the links in the text). Then set out hobgoblin place cards, devilish creatures to guard candy dishes, and boisterous noisemakers for a bloodcurdling sound track. Bottles of wine and cider sporting macabre labels will cackle “Drink me,” and pumpkin lanterns will beckon with an eerie glow. This is a table that will enliven the deadliest of celebrations.
    Creature Candy Dishes
    These bewitching characters are not as innocent as they seem. If you’re not careful, they’ll eat all the candy themselves.
    dish how to


    Print Images and and cut out pieces, trimming along edge of bird or cat and fence, if desired. To make bodies, cut a foot-long piece of bumpy black or orange pipe cleaner in half. Bend one piece in half to make legs; twist at top to form a tiny loop. Stick other pipe-cleaner piece through loop for arms; twist arms around loop three times so they are shorter than legs. Glue heads to top of loop. For candy dish, fold fence pieces (a three-sided section and a taller back section) along dotted lines; form into a box, and glue fence tabs to stabilize. Add candies, and pose sentries.


    Trick or Eat!

    from...

    trick or eat

    Trick Or Eat
    This ravenous pumpkin is cursed: He must offer up sweets to children all evening, yet he is not allowed to eat them (neither the sweets nor the children). A treat-filled bowl was placed in his cavernous mouth, and miniature flashlights were tucked on either side, against his jowls.


    Choir Boy Squashes

    from

    choir

    Choirboys
    Legend has it that the luckless souls who hear the Three Squashes’ song of woe shall vanish into the nearest vegetable patch, never to be seen or heard from again. Since narrow squashes are easier to hollow out if you work from both ends, these guys had the tops of their heads cut off.

    Friday, June 30, 2006


    Sparkling Cider

    Carlson's Sparkling Cider

    Individual Bottles with THE PIERCE HOUSE Label.

    1.00 a piece maybe? I prefer the larger bottle, however.


    12 Single Serve New England McIntosh Sparkling Cider

    This page is powered by Blogger. Isn't yours?